
A surprising amount of flood damage begins at the lowest opening in a home.
Water moving across a patio, driveway, porch, or walkway may reach the bottom of an exterior door before it reaches the surrounding walls. Once it passes the threshold, even a shallow layer can damage:
* Flooring
* Baseboards
* Drywall
* Insulation
* Furniture
* Electrical equipment
* Stored supplies
* Heating and cooling equipment
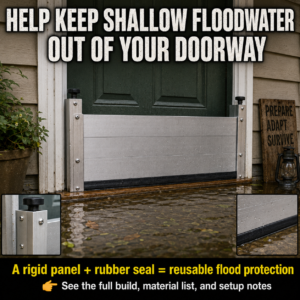
A removable doorway barrier can help slow or reduce water entering through a vulnerable door during **shallow, slow-moving surface flooding**.
The basic principle is:
**Rigid panel + strong side supports + compressible seals = temporary doorway protection**
However, this is not a universal floodproofing solution. Water can still enter through walls, drains, vents, cracks, utility penetrations, adjoining doors, or beneath the slab. As exterior water becomes deeper, it also places increasing pressure on the barrier and the building.
FEMA notes that dry-floodproofed buildings can experience pressure against walls, foundations, and floors, sometimes requiring structural reinforcement. ([fema.gov][1])
Treat this project as one layer of a larger flood plan—not permission to remain in a building when officials order evacuation.
—
## What This Barrier Can and Cannot Do
A properly fitted barrier may help with:
* Shallow rainwater collecting on a porch
* Temporary street or yard drainage backup
* Slow-moving water approaching a garage or shed
* Water entering beneath a low exterior door
* Minor nuisance flooding
* Reducing the amount of cleanup after a small event
It should not be relied upon for:
* Flash floods
* Fast-moving water
* Storm surge
* Wave action
* Deep standing water
* Debris impact
* Mudflows
* Long-duration flooding
* A visibly damaged building
* Any situation requiring evacuation
Ready.gov advises evacuating immediately when ordered and never walking, swimming, or driving through floodwater. Just six inches of fast-moving water can knock a person down. ([Ready.gov][2])
—
# Understanding the Design
A removable doorway system normally has five parts:
1. **Rigid barrier panel**
Resists bending under water pressure.
2. **Permanent side channels**
Transfer the force from the panel into the wall or doorway structure.
3. **Bottom seal**
Compresses against the threshold or prepared sill.
4. **Side seals**
Close small gaps between the panel and mounting channels.
5. **Compression mechanism**
Pushes the panel firmly against the seals.
A sixth component—a small pump or interior drainage point—is often useful because completely eliminating seepage is difficult.
—
# Important Design Limitation: Water Pressure
Water pressure increases with depth. It is lowest at the surface and greatest near the bottom of the panel.
That means doubling the protected water depth creates much more than a minor increase in the total force applied to the barrier. A thin sheet that works at three inches may bow, leak, or pull its anchors loose at twelve inches.
Never choose the barrier height based only on the tallest panel you can purchase.
Instead, determine:
* The expected water depth
* Panel width
* Panel material and thickness
* Amount of unsupported span
* Channel strength
* Anchor capacity
* Wall construction
* Threshold condition
* Possible debris impact
* Manufacturer or engineer-approved maximum depth
For deeper water or a wide doorway, use a manufactured, tested flood-barrier system or obtain professional engineering advice.
—
# Choosing a Suitable Doorway
The best location has:
* A concrete, masonry, or structurally sound framed opening
* A flat, continuous threshold
* Solid material for mounting both channels
* Enough wall space on each side
* No damaged or rotted framing
* No large gaps beneath the sill
* Clear access during installation
* An inward route that remains usable through another exit
Avoid mounting into:
* Thin vinyl siding alone
* Decorative trim
* Rotted wood
* Loose brick veneer
* Cracked masonry
* Hollow material without approved anchors
* Unverified electrical or plumbing locations
* A threshold that slopes sharply or contains large joints
The forces must transfer into structural material. Screwing aluminum rails into door trim alone does not create a reliable flood barrier.
—
# Recommended Materials
Exact dimensions depend on the opening and intended protection depth.
## Barrier panel
Choose one of the following:
* Marine-grade aluminum plate
* Structural aluminum flood-board section
* Purpose-built composite flood panel
* Exterior-rated laminated panel approved for wet conditions
* Manufactured modular flood planks
Ordinary plywood can swell, warp, delaminate, and lose strength after repeated wetting. It may be useful in an emergency but is not ideal for a reusable precision-sealed barrier.
## Side channels
* Aluminum or stainless-steel U-channels
* Purpose-built flood-barrier posts
* Corrosion-resistant mounting hardware
* Structural anchors appropriate for the wall
* Isolation material where dissimilar metals meet
## Seals
* Replaceable closed-cell EPDM or neoprene rubber
* Continuous bottom gasket
* Continuous side gaskets
* Manufacturer-compatible gasket adhesive, if required
* Optional threshold seal or removable sill plate
Avoid open-cell household foam. It can absorb contaminated water and may not recover after compression.
## Compression hardware
* Threaded compression knobs
* Cam clamps
* Wedge clamps
* Top compression bar
* Corrosion-resistant bolts and washers
## Additional supplies
* Exterior sealant compatible with the wall and metal
* Backer rod for appropriate joints
* Masonry or framing anchors
* Anti-seize compound for stainless hardware where approved
* Permanent marker or engraved orientation label
* Storage brackets
* Absorbent towels
* Small utility pump with appropriate electrical protection
* Battery backup if suitable
## Tools
* Tape measure
* Carpenter’s square
* Level
* Drill and appropriate bits
* Socket or wrench set
* Screwdrivers
* File or deburring tool
* Caulking gun
* Clamps
* Torque wrench when anchor specifications require one
* Safety glasses
* Work gloves
* Hearing protection
* Stud finder or utility-detection equipment
—
# Step 1: Investigate Where Water Enters
Do not assume the doorway is the only problem.
During dry weather, inspect:
* Door threshold
* Frame corners
* Siding joints
* Foundation cracks
* Air vents
* Crawlspace openings
* Garage-door edges
* Window wells
* Utility penetrations
* Floor drains
* Sewer or septic connections
* Grading near the house
* Gutters and downspouts
FEMA recommends keeping door seals and weatherstripping in good condition, sealing potential openings, considering sump pumps, and elevating vulnerable equipment. ([fema.gov][3])
Correct drainage and grading problems before depending on a doorway panel.
—
# Step 2: Estimate a Realistic Protection Height
Review:
* Previous high-water marks
* Local flood maps
* Drainage patterns
* Door and floor elevations
* Neighboring property runoff
* Local emergency-management information
* Insurer or flood-risk reports
Add a reasonable safety margin, but do not extend the panel beyond the depth the building and anchoring system can safely resist.
A homemade barrier is most appropriate for shallow nuisance water. If floodwater may rise substantially against the building, professional evaluation is needed.
—
# Step 3: Measure the Opening Carefully
Measure the width in at least three places:
* Near the threshold
* At the planned middle of the panel
* Near the top of the proposed barrier
Also measure:
* Threshold slope
* Channel mounting area
* Door-trim projection
* Distance to hinges
* Distance to door hardware
* Surface irregularities
* Panel insertion clearance
Do not assume the doorway is perfectly square.
Record the smallest usable opening and account for:
* Channel depth
* Gasket thickness
* Required compression
* Thermal expansion
* Installation clearance
A panel that is too loose will not compress the seals. One that is too tight may be impossible to install quickly.
—
# Step 4: Inspect the Structure
Determine what will support the channels.
For a wood-framed wall, identify:
* Stud locations
* King and jack studs around the door
* Sheathing condition
* Rot or insect damage
* Existing flashing
* Hidden wiring
For masonry, determine whether the surface is:
* Structural concrete
* Concrete block
* Solid brick
* Hollow brick
* Stone
* Decorative veneer
Anchor selection and spacing depend on the substrate. If you cannot verify the structure, consult a qualified contractor or engineer.
—
# Step 5: Prepare the Threshold
The bottom gasket needs a smooth, continuous compression surface.
Clean the threshold and repair:
* Cracks
* Loose mortar
* Protruding fasteners
* Broken tile
* Deep grout joints
* Rotted wood
* Missing sealant
For an irregular threshold, consider installing a permanent metal sill plate that provides a smooth sealing surface. It must be firmly supported and sealed beneath—not simply glued over a damaged threshold.
Do not create a raised edge that becomes an unnoticed trip hazard.
—
# Step 6: Cut and Finish the Panel
Have metal or composite material cut to the designed dimensions.
The panel should be:
* Flat
* Free from deep scratches
* Stiff enough for the intended span
* Resistant to water and corrosion
* Easy enough for the intended user to lift
* Smooth around every exposed edge
Deburr cut metal carefully. Round or protect sharp corners.
Label the panel:
* Exterior side
* Top
* Bottom
* Door location
* Maximum approved water depth
For multiple barriers, number each panel and doorway so they cannot be confused during an emergency.
—
# Step 7: Install the Side Channels
Dry-fit both channels before drilling.
Confirm that they are:
* Vertical
* Parallel
* At equal height
* Firmly seated against the wall
* Correctly spaced for the panel
* Clear of door operation
* Accessible to the compression hardware
Mark the anchor locations, then check for concealed utilities.
Drill and install anchors according to their specifications. Incorrect hole diameter, depth, cleaning, edge distance, or tightening can dramatically reduce holding strength.
Apply compatible sealant behind or alongside the channels where needed to prevent water bypass. Do not depend on a surface bead alone when water can travel behind the rail.
—
# Step 8: Install the Side and Bottom Seals
Fit a continuous gasket along the intended sealing surfaces.
Important rules:
* Avoid gaps at corners.
* Do not stretch rubber during installation.
* Do not use a damaged or permanently flattened gasket.
* Keep sealing surfaces clean.
* Follow the adhesive’s curing instructions.
* Allow the gasket to compress without being crushed completely.
* Ensure corner joints cannot create a direct water path.
The bottom corners are usually the most difficult areas to seal because the vertical and horizontal gaskets meet there.
Test those corners carefully.
—
# Step 9: Add the Compression System
The compression hardware must press the panel evenly against the seals.
Depending on the design, this may involve:
* Top-mounted screw knobs
* Side wedges
* Cam clamps
* A removable upper crossbar
* Integrated flood-barrier clamps
Tighten gradually and alternate between sides.
Do not overtighten. Excessive force can:
* Distort the panel
* Crush the gasket
* Bend the channels
* Strip threads
* Pull anchors from the wall
* Make later removal difficult
Mark the normal tightened position so users know when adequate compression has been reached.
—
# Step 10: Test With Clean Water
Never wait for a storm to test the barrier.
Use a controlled, shallow clean-water test when doing so will not damage the building or neighboring property.
A practical test:
1. Install the panel.
2. Confirm every clamp is engaged.
3. Block or contain a shallow amount of clean water outside.
4. Increase the depth gradually.
5. Observe the bottom corners first.
6. Check behind both mounting channels.
7. Mark visible leak locations.
8. Stop if the panel bows or anchors move.
9. Drain the test water safely.
10. Adjust the system and repeat.
A few drops may indicate a correctable seal problem. A steady stream, panel deflection, cracking sound, or channel movement means the test should stop immediately.
Never test beyond the designed water depth.
—
# Step 11: Plan for Seepage
Even a good removable panel may allow limited seepage.
Prepare an interior collection area with:
* Absorbent barriers
* Towels
* Wet vacuum
* Floor drain
* Sump basin
* Small utility pump
* Pump discharge hose
* Battery backup where appropriate
Never operate ordinary electrical equipment while standing in water. Ready.gov warns against touching wet electrical equipment or using it while standing in floodwater. ([ready.gov][4])
Use only equipment rated for its location and follow all electrical-safety requirements.
—
# Step 12: Create a Fast Deployment Routine
The barrier is an active protection system—it only works if somebody installs it before water reaches the doorway.
Store all parts together:
* Panel
* Compression bar
* Knobs or clamps
* Required wrench
* Spare gasket
* Gloves
* Flashlight
* Installation instructions
* Doorway photograph
* Emergency contact information
Practice installation until household members can complete it safely and correctly.
Never delay evacuation to install the barrier.
—
# Improving the Rest of the Property
A doorway panel works best when combined with other measures.
Consider:
* Cleaning gutters and drains
* Extending downspouts away from the foundation
* Correcting ground slope
* Installing approved backwater valves
* Adding a sump pump and backup power
* Moving valuables to higher levels
* Elevating electrical and mechanical equipment
* Replacing vulnerable materials
* Sealing low penetrations
* Protecting window wells
* Purchasing flood insurance
FEMA identifies concrete, masonry, tile, certain treated lumber, metal, plastics, composite products, and synthetic membranes as examples of materials that can better tolerate flood exposure than carpeting, ordinary drywall, and untreated wood. ([fema.gov][3])
—
# Common Construction Mistakes
## Mounting into decorative trim
Trim may pull away before the panel reaches its intended capacity.
## Using a flexible, thin sheet
A panel that bows can release gasket pressure and leak around its edges.
## Ignoring the bottom corners
Most leakage begins where the side and threshold seals meet.
## Using absorbent foam
Open-cell foam can become waterlogged, contaminated, and permanently compressed.
## Building the panel too tall
Higher water creates greater force. The door panel, anchors and building all require evaluation.
## Forgetting alternative water paths
Water may enter through drains, walls, vents, garages, and neighboring openings.
## Blocking the only safe exit
Occupants must retain another evacuation route.
## Installing after water arrives
Entering floodwater to fit a barrier is dangerous.
## Assuming “waterproof” means leak-free
Small imperfections, debris and wall movement can create seepage.
## Redirecting water toward a neighbor
Barriers and landscaping can change drainage. Local rules may limit where water can be redirected.
—
# Maintenance Checklist
## Every three months
* Clean the panel and channels.
* Inspect gaskets for cracking.
* Check for permanent compression.
* Lubricate hardware with an approved product.
* Confirm all fasteners remain tight.
* Inspect sealant joints.
* Remove dirt from the threshold.
* Test installation and removal.
## Before storm season
* Perform a controlled leak test.
* Replace damaged seals.
* Confirm the panel has not warped.
* Check pump operation.
* Charge backup batteries.
* Review evacuation plans.
* Move valuable items upward.
* Confirm flood-insurance information.
## After every deployment
* Photograph the condition before removal.
* Wear protective equipment.
* Treat floodwater as contaminated.
* Wash and disinfect appropriate components.
* Dry the panel completely.
* Inspect anchors and channels.
* Replace contaminated absorbent materials.
* Record leakage or damage.
* Repair problems before storage.
—
# Pre-Storm Installation Checklist
* [ ] Officials have not ordered evacuation
* [ ] Another safe exit remains available
* [ ] Threshold is clean
* [ ] Side channels are undamaged
* [ ] Gaskets are clean and flexible
* [ ] Panel is oriented correctly
* [ ] All compression points are engaged
* [ ] Pump and drainage system are ready
* [ ] Important belongings are elevated
* [ ] Electricity can be shut off safely if required
* [ ] Emergency alerts are being monitored
* [ ] Vehicles are already on higher ground
* [ ] Nobody will enter floodwater to inspect the barrier
—
# When to Choose a Manufactured Barrier
A tested commercial system is the better option when:
* The doorway is wide.
* Expected water depth is more than minor.
* The building has previously flooded.
* The wall construction is uncertain.
* Reliable protection is financially critical.
* Installation will be used at a rental or business.
* Local permits or certification are required.
* The opening may receive debris impact.
* You need published load and leakage ratings.
Look for a system with:
* Documented maximum water depth
* Tested panel span
* Approved anchoring details
* Replaceable seals
* Corrosion-resistant hardware
* Clear installation instructions
* Available replacement parts
* Professional installation support
—
# Final Takeaway
A removable doorway barrier can be a useful defense against shallow, slow-moving surface water when it is properly designed, anchored, sealed, tested, and installed before flooding begins.
Its effectiveness depends on the entire assembly:
* The panel must resist bending.
* The channels must transfer force into structural material.
* The seals must compress continuously.
* The threshold must be smooth.
* The anchors must match the wall.
* Seepage must have somewhere safe to go.
* Other openings and drains must also be addressed.
Do not use a homemade doorway barrier as protection from flash flooding, storm surge, deep water, or fast-moving flow. Never ignore an evacuation order to protect property.
**Use the barrier to reduce damage—not to justify remaining in danger.**
—