
Water does not need to reach the windows to cause expensive damage.
During heavy rain, shallow runoff may collect against an exterior door, seep beneath the threshold, soak flooring, damage drywall, and spread contaminated water throughout the house.
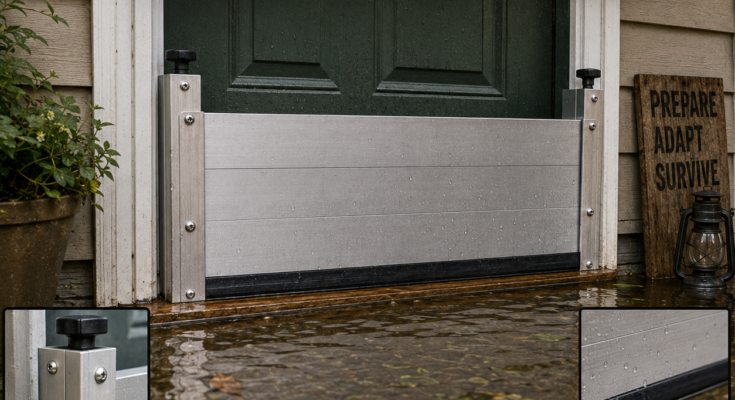
A removable doorway barrier can provide an additional line of defense against minor, slow-moving surface water. The design uses:
- A rigid removable panel
- Permanently anchored side channels
- Rubber seals around the panel
- Mechanical compression to hold the seals tightly against the doorway
When rain threatens, the panel slides or lowers into the channels and is tightened into place. After the threat passes, it can be removed so the doorway functions normally.
The basic principle is:
A rigid panel + anchored channels + compressed rubber seals = reusable shallow-water protection
However, this project has strict limitations.
A homemade doorway barrier is not a substitute for evacuation, structural floodproofing, proper drainage, flood insurance, or a professionally engineered flood-protection system. It should never be trusted against deep water, fast-moving water, waves, storm surge, river flooding, or any situation in which water pressure could damage the wall or trap occupants inside.
What a Doorway Flood Barrier Can—and Cannot—Do
A well-built removable barrier may help slow water entering through a doorway during events such as:
- Shallow driveway runoff
- Water temporarily collecting on a porch
- Minor street drainage backups
- Wind-driven rain entering beneath a door
- Brief pooling caused by overwhelmed surface drains
- Low, slow-moving water approaching a garage or outbuilding
It cannot make the entire building waterproof.
Water may still enter through:
- Wall joints
- Siding
- Brick weep holes
- Foundation cracks
- Plumbing penetrations
- Floor drains
- Sewer lines
- Crawl-space vents
- Basement windows
- Adjacent doors
- Beneath the foundation
- Gaps around the doorframe
The barrier is only one component in a wider water-management plan.
Do not use a DIY barrier for:
- Flash flooding
- Fast-moving water
- Storm surge
- Coastal waves
- Dam or levee failure
- Deep standing water
- Flooding above the barrier
- A structurally damaged doorway
- A mobile or poorly anchored structure
- Any situation requiring evacuation
Ready.gov warns that six inches of moving water can knock a person down and one foot of moving water can carry away a vehicle. Always follow official warnings and evacuate immediately when instructed. Ready.gov Flood Safety
Why Water Depth Matters
Floodwater creates pressure against every submerged part of the barrier.
The deeper the water becomes, the greater the load on:
- The panel
- Side channels
- Fasteners
- Door framing
- Adjacent walls
- Foundation
- Floor slab
The load does not increase gently. Hydrostatic force rises rapidly as water becomes deeper.
A short barrier holding back a few inches of slow-moving runoff is a very different structure from a panel attempting to hold back two or three feet of floodwater.
Even if the panel itself does not break, water pressure may:
- Pull fasteners from the wall
- Bend the side channels
- Bow the panel
- Separate the doorframe from the structure
- Force water through adjacent wall cavities
- Damage the foundation
- Cause sudden barrier failure
For anything beyond minor nuisance flooding, consult a qualified engineer or purchase a tested flood-barrier system designed for the expected water depth and building type.
Choose the Right Doorway
Begin with the door where shallow water is most likely to enter.
Good candidates may include:
- A concrete or masonry entry
- A doorway with solid structural framing
- A garage personnel door
- A basement walkout with an exterior drain
- A shed or workshop entrance
- A low porch doorway exposed to runoff
Poor candidates include:
- A rotted wooden frame
- Loose brick veneer
- Cracked masonry
- Vinyl trim with no structural backing
- A door that already shifts in its opening
- A doorway required as the household’s only emergency exit
- A wall showing previous structural movement
- A location exposed to fast water or debris
The channels must attach to sound structural material—not merely decorative trim.
Before drilling, determine what is behind the visible surface:
- Solid concrete
- Concrete block
- Structural brick
- Wood framing
- Sheathing
- Hollow trim
- Utility wiring
- Plumbing
- Security-system cables
If you cannot confirm a safe anchoring location, stop and consult a contractor.
Preserve a Safe Exit
A barrier across a doorway can interfere with evacuation.
Before building it, answer these questions:
- Is another exterior exit available?
- Can everyone in the house operate the barrier?
- Can it be released from inside?
- Could water pressure prevent removal?
- Would a child, older adult, or disabled person become trapped?
- Does the barrier violate local fire or building codes?
- Can emergency responders enter another way?
- Will pets still have a safe evacuation route?
Never install a barrier that locks occupants inside or requires someone to step into floodwater to release it.
The panel should use quick, tool-free interior controls whenever possible. Store any required handle or release tool beside the barrier—not in a garage that could become inaccessible.
Recommended Design
The illustrated system consists of five main components.
1. Rigid barrier panel
The panel spans the doorway and resists bending.
Possible materials include:
- A manufactured composite flood panel
- Marine-grade plywood sealed on every face and edge
- Exterior-rated plywood reinforced with stiffeners
- Aluminum plate sized by a fabricator or engineer
- A commercially manufactured modular barrier
Ordinary thin plywood, particleboard, MDF, interior paneling, and plastic sheet are poor choices. They may swell, bow, crack, or pull away from the seals.
2. Side-retaining channels
Two vertical channels hold the panel in position.
They may be fabricated from:
- Aluminum channel
- Stainless-steel channel
- Galvanized-steel channel
- A proprietary flood-barrier track
The channels must be sized for the panel thickness, gasket, expected load, and anchoring method.
3. Bottom seal
A compressible rubber gasket seals the panel against the threshold, sill, or prepared base.
Suitable gasket materials may include:
- Closed-cell EPDM rubber
- Neoprene
- A replaceable bulb seal
- A manufacturer-approved flood-barrier gasket
Open-cell foam absorbs water and deteriorates quickly. Ordinary household weatherstripping may compress too easily or detach when wet.
4. Vertical seals
Gaskets between the panel and channels reduce leakage along both sides.
5. Compression hardware
Threaded knobs, toggle clamps, wedges, or another mechanical system press the panel against its seals.
The hardware should:
- Tighten evenly
- Resist corrosion
- Operate without electricity
- Be usable with wet hands
- Release quickly from inside
- Remain attached so pieces are not lost
Materials List
Exact dimensions depend on the doorway and expected water exposure.
Barrier components
- Rigid exterior-grade panel
- Two metal retaining channels
- Closed-cell EPDM or neoprene gasket
- Corrosion-resistant compression clamps or threaded knobs
- Stainless-steel or hot-dip galvanized fasteners
- Structural anchors matched to the wall material
- Exterior-grade sealant compatible with metal, masonry, wood, and gasket material
- Reinforcing bars or stiffeners if required
- Removable top caps or safety covers for the channels
- Labels showing the inside and outside faces
Measuring and installation supplies
- Tape measure
- Straightedge
- Carpenter’s square
- Level
- Pencil or removable marker
- Painter’s tape
- Manufacturer-approved anchor-setting tools
- Drill and suitable bits
- Screwdriver or socket set
- Caulking gun
- Clamps
- Utility knife
- Rubber roller
- Vacuum or brush for drilling dust
Safety equipment
- Safety glasses
- Hearing protection
- Work gloves
- Dust mask or respirator appropriate for drilling dust
- Knee protection
- Flashlight
- Voltage and utility detector when appropriate
Testing supplies
- Garden hose
- Towels
- Absorbent pads
- Water-resistant marker
- Stopwatch
- Camera
- Inspection checklist
- Optional wet-dry vacuum for controlled testing only
Do not use a wet-dry vacuum in standing floodwater or where electrical hazards may exist.
Step 1: Investigate Why Water Reaches the Door
A barrier may treat the final entry point without correcting the reason water accumulates there.
Inspect the property during dry weather and, from a safe location, during ordinary rain.
Look for:
- Clogged gutters
- Overflowing downspouts
- Soil sloping toward the house
- Sunken paving
- Blocked porch drains
- Driveway runoff
- Broken drainage pipes
- Disconnected downspout extensions
- Landscape edging that traps water
- Mulch piled against the siding
- A threshold lower than surrounding pavement
- Water discharged by a sump pump near the door
Correcting drainage may provide more dependable protection than trying to hold water against the building.
Possible improvements include:
- Cleaning gutters
- Extending downspouts away from the foundation
- Regrading soil
- Repairing pavement
- Clearing drains
- Adding an approved channel drain
- Installing a battery-backed sump system
- Redirecting runoff without harming neighboring property
Consult a drainage professional when changes could affect foundations, public drains, neighboring land, or erosion.
Step 2: Establish a Realistic Protection Height
Do not make the barrier excessively tall simply because more material is available.
A taller panel:
- Receives greater water pressure
- Places larger loads on the anchors
- Is harder to lift
- Creates a greater trip and evacuation hazard
- May shift water into the walls
- Can give occupants false confidence
For a DIY system, the intended use should be limited to the shallow nuisance-water condition evaluated for that doorway.
If past water has risen substantially, flowed rapidly, carried debris, or covered a large portion of the door, use a professionally designed solution.
Mark a maximum intended water line on the outside of the barrier.
If water approaches that line:
- Stop relying on the panel.
- Follow local emergency instructions.
- Move to a safe location.
- Do not go outside to adjust the barrier.
- Do not walk through floodwater.
Step 3: Measure the Opening Carefully
Take measurements at several points because older doorways may not be square.
Record:
- Clear width at the bottom
- Clear width at the planned top of the panel
- Distance between mounting surfaces
- Height of the proposed panel
- Threshold width
- Threshold slope
- Difference in height from one side to the other
- Door-trim projection
- Distance to hinges and hardware
- Condition of both mounting surfaces
- Available anchoring depth
Measure each dimension at least twice.
The panel should fit inside the channels with enough space for:
- Gasket thickness
- Thermal movement
- Paint or protective coatings
- Easy installation
- Compression without binding
Do not assume a standard door width.
Create a cardboard or thin scrap template first if the opening has irregular trim, masonry, or threshold transitions.
Step 4: Inspect the Threshold
The bottom seal can work only if its contact surface is:
- Solid
- Relatively smooth
- Clean
- Stable
- Continuous
- Free of major cracks
- Properly connected to the surrounding structure
Water can travel beneath a barrier if the threshold contains:
- Deep mortar joints
- Uneven brick
- Cracked concrete
- Loose tile
- Warped wood
- Open joints
- Drain channels
- Rotted material
A contractor may need to repair or create a smooth, flood-resistant base before the barrier is installed.
Do not cover a drainage opening without determining where the water will go. Blocking one route can cause water to rise elsewhere.
Step 5: Select the Panel Material
Exterior or marine-grade plywood
Plywood can be suitable only for a carefully limited shallow-water project.
Use a thick, high-quality exterior panel and reinforce it if necessary. Seal:
- Front
- Back
- Top edge
- Bottom edge
- Side edges
- Drilled holes
- Fastener penetrations
The cut edges are especially vulnerable to water absorption.
Plywood may still warp, delaminate, or deteriorate, so inspect it regularly and replace it at the first sign of damage.
Aluminum
Aluminum is corrosion-resistant and easier to handle than steel of similar dimensions, but proper thickness and reinforcement require informed design.
Thin aluminum can bow dramatically under pressure.
Composite panels
Some exterior composite panels resist water better than plywood, but their strength varies. A waterproof material is not automatically strong enough to serve as a flood barrier.
Commercial barrier panels
A tested commercial system may be the best option for an occupied home. It provides known:
- Maximum water depth
- Opening-width limits
- Anchor requirements
- Gasket specifications
- Installation instructions
- Testing information
Do not mix components from unrelated systems unless the manufacturers approve the combination.
Step 6: Cut and Reinforce the Panel
Cut the panel according to the measured opening and selected channel design.
Then:
- Check that the panel is square.
- Smooth sharp corners and splinters.
- Dry-fit it without gaskets.
- Confirm that it can be installed from inside.
- Mark the interior and exterior faces.
- Add horizontal stiffeners if required.
- Seal exposed plywood edges.
- Allow all coatings to cure completely.
- Recheck the dimensions after finishing.
Any reinforcing bar should be positioned so it does not:
- Prevent the door from opening
- Create sharp edges
- Interfere with clamps
- Damage the gasket
- Make the panel too heavy to deploy
- Catch on clothing during an evacuation
Practice lifting the completed panel. If one person cannot safely install it, redesign it as lighter modular sections or use a commercial system.
Step 7: Prepare the Side Channels
Each channel must:
- Remain straight
- Match the panel thickness
- Accommodate the gasket
- Resist outward and inward movement
- Be anchored into structural material
- Avoid sharp exposed edges
Mark the channel positions with a level.
The two channels must be:
- Parallel
- Plumb
- At the same height
- Properly aligned with the threshold seal
- Far enough apart for the finished panel
- Close enough to permit gasket compression
A small alignment error can produce a large leak or prevent installation during an emergency.
Use removable top caps when the panel is not installed so the open channels do not collect dirt, insects, or debris.
Step 8: Anchor the Channels to the Structure
This is the most critical construction step.
The channels must not be attached only to:
- Decorative molding
- Thin siding
- Vinyl trim
- Brittle surface stucco
- Loose mortar
- Unreinforced veneer
- Rotted framing
Fasteners and anchors must be selected for the actual substrate.
Possible mounting conditions include:
| Structure | Typical concern |
|---|---|
| Solid concrete | Anchor diameter, depth, edge distance and drilling quality |
| Concrete block | Hollow cells, weak face shells and need for approved anchors |
| Structural brick | Mortar condition and distance from brick edges |
| Wood framing | Finding sound studs and preventing water intrusion |
| Brick veneer | Veneer may not be suitable for structural loading |
| Stone | Irregular surfaces and uncertain internal condition |
Follow the anchor manufacturer’s installation requirements exactly.
Those requirements may specify:
- Drill-bit diameter
- Hole depth
- Minimum edge distance
- Cleaning procedure
- Torque
- Cure time
- Substrate strength
- Corrosion rating
- Minimum spacing
Drilling near the edge of masonry can crack it. Drilling into a wall can also strike hidden electrical wiring, plumbing, or security cables.
If the substrate is uncertain, hire a qualified installer.
Step 9: Seal Behind the Channels
Water can leak behind a perfectly straight channel if the joint between the metal and wall remains open.
Before final tightening:
- Clean the mounting surface.
- Remove loose paint, dirt, oil, and dust.
- Allow the surface to dry.
- Apply a compatible exterior sealant behind the channel.
- Position the channel.
- Install and tighten the structural anchors correctly.
- Tool the exposed sealant joint.
- Seal fastener penetrations where required.
- Allow the sealant to cure.
Do not depend on sealant as the structural attachment.
Sealant reduces seepage. The anchors resist load.
Select a sealant approved for:
- Exterior exposure
- Wet conditions
- The wall material
- The channel metal
- Expected temperature changes
- Any protective coating
Some sealants react poorly with particular plastics, rubber compounds, metals, or masonry.
Step 10: Install the Gaskets
A gasket must compress enough to fill small surface irregularities without being crushed flat.
Install seals along:
- The bottom of the panel
- Both vertical edges
- Any joint between modular panel sections
Depending on the design, the gasket may attach to either the panel or the fixed channel.
Before applying adhesive-backed material:
- Clean the surface.
- Remove oil and dust.
- Confirm compatibility.
- Test a small section.
- Apply the gasket without stretching it.
- Press it evenly into place.
- Avoid gaps at the corners.
- Allow the adhesive to cure.
Stretching rubber during installation can cause it to shrink later and leave open corners.
Make the bottom gasket replaceable. It receives the most abrasion and is likely to wear first.
Step 11: Add the Compression System
The panel must be pushed firmly and evenly against its seals.
Possible compression methods include:
- Threaded hand knobs
- Toggle clamps
- Captive wedges
- Cam locks
- Manufacturer-designed compression bars
Do not rely on friction alone.
Position the hardware so pressure is distributed rather than concentrated at one small point.
The system should allow the user to:
- Set the panel into position.
- Engage the retainers.
- Tighten the bottom seal.
- Tighten both sides evenly.
- Confirm that the panel cannot lift.
- Release everything from the dry side.
Use captive hardware whenever possible. A loose nut dropped into dark floodwater may make the entire barrier unusable.
Step 12: Dry-Fit the Complete Barrier
Do not wait for rain to test the fit.
Install the barrier during dry weather.
Confirm that:
- The panel enters the channels smoothly.
- No tools are required unless intentionally designed.
- The gaskets remain in position.
- The panel sits evenly on the threshold.
- Both sides tighten correctly.
- The door can close if the design requires it.
- The barrier does not damage door weatherstripping.
- The release is accessible from inside.
- An alternate exit remains available.
- One adult can deploy it safely.
- The panel can be removed after compression.
Time the installation.
A practical system should be deployable well before water reaches the doorway. If it takes twenty minutes, requires missing tools, or needs two strong adults who may not be home, simplify the design.
Step 13: Conduct a Controlled Water Test
Never perform the first test during a storm.
Start with a gentle hose test that checks sealing rather than structural resistance.
Basic leak test
- Install and tighten the barrier.
- Place dry towels or absorbent paper along the inside edge.
- Close nearby windows and protect electrical equipment.
- Apply a gentle stream of water to the exterior threshold.
- Begin at one corner.
- Move slowly along the bottom seal.
- Test both side joints.
- Watch the interior for moisture.
- Mark each leak location.
- Stop immediately if the panel moves, bows, or loosens.
Do not create a deep pool against the barrier for a DIY test. Deliberately impounding water introduces structural loads and may cause damage.
A few droplets do not necessarily mean total failure. Many temporary flood barriers reduce water rather than creating a perfectly dry seal. However, continuing leakage may overwhelm the interior before the storm ends.
Correct leaks by identifying the cause:
- Insufficient gasket compression
- Uneven threshold
- Gasket gap
- Misaligned channel
- Sealant failure
- Loose anchor
- Warped panel
- Debris beneath the bottom seal
Do not simply tighten the clamps until the panel bends.
Step 14: Mark the Deployment Sequence
Label every component clearly.
Suggested markings include:
- INSIDE
- OUTSIDE
- LEFT
- RIGHT
- BOTTOM
- MAXIMUM INTENDED WATER LINE
- INSTALL BEFORE WATER REACHES DOOR
- DO NOT BLOCK ONLY EXIT
Attach a short waterproof instruction card nearby:
- Receive flood alert.
- Move valuables and hazardous materials higher.
- Confirm alternate exit.
- Clean threshold and channels.
- Insert panel.
- Engage both retainers.
- Tighten bottom and sides evenly.
- Inspect from inside.
- Evacuate if ordered.
- Never cross floodwater to adjust the panel.
Take photographs of the correct installation for household members who did not build it.
Step 15: Store the Panel Properly
Store the panel:
- Indoors
- Dry
- Flat or securely upright
- Close to the protected doorway
- Away from direct sunlight
- Away from chemicals
- Where it will not warp
- Where household members can reach it quickly
Do not bury it behind seasonal decorations, tools, or furniture.
Keep a deployment kit beside it containing:
- Barrier instructions
- Flashlight or headlamp
- Gloves
- Spare gasket
- Cleaning cloth
- Replacement captive hardware
- Compatible sealant for non-emergency maintenance
- Emergency contact list
Sealant repairs should be completed and cured before a storm, not applied while water is already approaching.
How to Deploy the Barrier Before Heavy Rain
Install the panel before conditions become dangerous.
Deployment procedure
- Monitor official weather alerts.
- Charge phones and backup batteries.
- Move vehicles to higher ground if instructed and safe.
- Move chemicals, fuel, documents, and valuables above expected water level.
- Confirm that drains and gutters are clear without entering dangerous weather.
- Inspect the threshold.
- Remove dirt, leaves, and stones from the seal area.
- Insert the barrier.
- Engage all compression hardware.
- Check the seal from inside.
- Keep everyone away from exterior floodwater.
- Maintain an evacuation route.
- Follow instructions from local authorities.
Do not leave the safety of the house to retrieve, tighten, or photograph the barrier after water has arrived.
Combine the Barrier With Other Flood-Reduction Measures
A doorway barrier works best as part of a layered plan.
Consider:
- Clean gutters and downspouts
- Downspout extensions
- Correct yard grading
- Channel drains
- Backwater valves installed by qualified professionals
- Sump pumps
- Battery backup for the sump pump
- Water alarms
- Raised electrical equipment
- Elevated appliances
- Flood-resistant lower-wall materials
- Sealed utility penetrations
- Properly deployed temporary sandbags
- Flood insurance
- A household evacuation plan
Ready.gov recommends clearing drains and gutters, moving valuables to higher levels, considering check valves, and using a sump pump with battery backup as part of flood preparation. Ready.gov Flood Preparedness
Do not redirect water onto a neighbor’s property or public roadway without appropriate approval.
Using Sandbags With the Barrier
Sandbags can help redirect small amounts of surface water, but they do not create a watertight wall.
The Federal Alliance for Safe Homes recommends filling bags approximately halfway, tamping each bag into position, completing each layer before beginning the next, and using plastic sheeting to reduce seepage at openings. It also notes that sandbags are intended for relatively small water flows and will not completely seal out water. FLASH Sandbag Guidance
If sandbags are used:
- Deploy them before water arrives.
- Wear gloves and sturdy footwear.
- Do not overfill them.
- Avoid blocking necessary drainage routes.
- Keep them from damaging the barrier hardware.
- Treat used bags as potentially contaminated.
- Follow local disposal instructions.
Wet sandbags are extremely heavy. Do not attempt to move them during active flooding.
Common Building Mistakes
Attaching channels to decorative trim
Door casing and vinyl trim may not resist water pressure.
Anchor to verified structural material.
Using a thin panel
A waterproof panel can still bow or break.
Strength and water resistance are separate requirements.
Depending only on caulk
Sealant cannot replace mechanical anchors, channels, and compression hardware.
Using open-cell foam
Open-cell foam absorbs water and may remain wet.
Use a compatible closed-cell gasket intended for compression and wet exposure.
Ignoring the bottom corners
The junction between the side and bottom seals is a common leak location.
Make the corner transitions continuous and test them carefully.
Building the panel too tall
A taller barrier receives much greater water force and becomes harder to cross or remove.
Limit DIY use to the shallow condition for which the opening has been evaluated.
Making the barrier too heavy
If household members cannot install it quickly, it will not be dependable.
Use modular sections or a manufactured system when necessary.
Drilling into unknown walls
Hidden utilities and unsuitable substrates can turn a small project into a dangerous repair.
Confirm construction before drilling.
Blocking the only exit
Property protection must never trap occupants.
Maintain an alternate evacuation route.
Installing after water arrives
Floodwater can rise rapidly and may conceal electrical hazards, holes, debris, or contamination.
Deploy early or leave the property.
Common Deployment Mistakes
Failing to clean the threshold
One leaf, stone, or twig can create a leak beneath the gasket.
Tightening only one side
Uneven compression can twist the panel and open the opposite corner.
Expecting a perfectly dry interior
Temporary barriers often slow water rather than eliminate every drop.
Maintain an interior water-management plan.
Ignoring other entry points
Water may bypass the doorway through walls, drains, vents, or foundations.
Inspect the whole building.
Relying on the barrier instead of evacuating
A panel protects property only within its design limits. It does not protect a person from rapidly rising floodwater.
Walking outside to inspect it
Never enter floodwater to check, tighten, or remove the barrier.
Leaving it installed indefinitely
The barrier can obstruct normal access and emergency escape.
Remove it when authorities say conditions are safe.
What to Do if Water Leaks Through
Small leakage does not always mean the panel has structurally failed, but it must be managed from a safe, dry location.
Possible interior measures include:
- Absorbent barriers
- Towels
- A water alarm
- A properly installed floor drain
- A sump system with battery backup
- A wet-dry vacuum used only where no floodwater or electrical hazard exists
Immediately leave or move to a safer location if:
- The panel bows
- Anchors move
- Channels separate from the wall
- The doorframe shifts
- Water rises rapidly
- Electrical outlets become wet
- The building makes unusual cracking sounds
- Authorities order evacuation
- The alternate exit becomes threatened
Never brace the barrier with your body.
Electrical Safety During Flooding
Floodwater and electricity are a deadly combination.
Ready.gov advises avoiding electrical equipment that is wet or located where a person is standing in water. Electricity should be turned off only when it can be done safely. Ready.gov Flood Safety
Before expected flooding:
- Move extension cords off the floor.
- Unplug vulnerable devices when safe.
- Raise portable electrical equipment.
- Know the location of the main electrical panel.
- Ask an electrician about elevating flood-prone circuits and equipment.
- Install battery-powered water alarms.
Do not enter water to reach the electrical panel.
After flooding, have damaged wiring and appliances inspected before restoring power.
Cleaning After Flood Exposure
Floodwater may contain:
- Sewage
- Fuel
- Pesticides
- Chemicals
- Animal waste
- Sharp debris
- Bacteria
- Mold spores
Do not treat the used panel as though it encountered clean rainwater.
After officials say the area is safe:
- Photograph the installation and any damage.
- Wear gloves, boots, and appropriate protective equipment.
- Remove the panel from the dry side when possible.
- Avoid touching your face.
- Wash the panel with suitable cleaning products.
- Follow public-health guidance for disinfection.
- Clean the channels.
- Remove debris from gasket grooves.
- Dry every component completely.
- Inspect all seals and fasteners.
- Replace contaminated porous materials.
- Wash hands thoroughly.
Children should not participate in flood cleanup.
Dispose of contaminated materials according to local instructions.
Maintenance Schedule
Every month during flood season
- Inspect the stored panel.
- Check for warping or corrosion.
- Clean the channels.
- Examine rubber seals.
- Confirm that hardware moves freely.
- Verify that the deployment kit is complete.
- Review the evacuation plan.
Every three months
- Dry-fit the barrier.
- Tighten loose nonstructural hardware.
- Inspect channel sealant.
- Check the threshold for cracks.
- Confirm that mounting surfaces remain sound.
- Test the water alarm.
- Test the sump-pump backup.
Once a year
- Perform a controlled hose test.
- Replace deteriorated gaskets.
- Repair damaged protective coatings.
- Review flood risk and insurance.
- Update emergency contact information.
- Photograph the complete system.
- Practice installation with every capable household member.
After every deployment
- Clean and dry the panel.
- Inspect anchors and channels.
- Look for bowing or permanent deformation.
- Replace damaged seals.
- Record the water depth and leakage.
- Correct problems before storing the system.
Keep a Barrier Inspection Log
| Date | Inspection or test | Gasket condition | Hardware condition | Leakage | Corrective action |
|---|---|---|---|---|---|
| Aug. 10 | Dry fit | Good | Good | Not tested | None |
| Aug. 12 | Gentle hose test | Small gap at left corner | Good | Minor | Replaced corner seal |
| Aug. 13 | Repeat test | Good | Good | No visible leak | Ready |
| Sept. 4 | Post-storm inspection | Good | One knob loose | Minor seepage | Tightened and retested |
A written log prevents small defects from being forgotten after the weather clears.
Is a DIY Doorway Flood Barrier Worth Building?
It may be worthwhile when:
- The known problem is shallow, slow-moving runoff.
- The doorway has sound structural mounting surfaces.
- The threshold can accept a continuous seal.
- An alternate exit remains available.
- The panel can be installed before water arrives.
- The household understands the barrier’s limitations.
- The design can be tested safely.
- Drainage improvements are also being addressed.
It may not be appropriate when:
- Water rises rapidly.
- Past flooding has been deep.
- The area is exposed to storm surge.
- Water carries heavy debris.
- The building or doorway is structurally weak.
- The barrier would block the only exit.
- Water can easily bypass the doorway.
- The user cannot safely lift the panel.
- No one can verify the anchoring method.
- Local codes or insurance requirements prohibit the modification.
A commercially tested barrier or professionally designed floodproofing system is the safer choice when potential water depth, current, structural loading, or property value makes failure especially consequential.
FEMA notes that formal dry-floodproofing designs may require certification by a registered professional engineer or architect in regulated situations. Residential floodplain requirements also differ from those for nonresidential buildings. Check local rules before treating a doorway barrier as a permanent floodproofing measure. FEMA Floodproofing Definition and Requirements
Final Safety Note
A removable doorway barrier can help reduce damage from a limited amount of shallow surface water, but it cannot make an ordinary house invulnerable to flooding.
Build it around a sound doorway. Anchor the channels into verified structural material. Use a rigid panel, replaceable closed-cell seals, and even mechanical compression. Test the system during dry weather and store it where it can be installed quickly.
Most importantly, know when to abandon it.
Do not enter floodwater to install, inspect, tighten, or remove the panel. Never allow it to block the household’s only escape route. If water rises rapidly, reaches the barrier’s intended limit, carries debris, or threatens the structure, follow official instructions and move to safety.
The barrier is replaceable. The building is repairable. People are not.
Used within realistic limits, a removable doorway panel can become a useful layer in a broader flood-preparedness plan—but drainage, alerts, insurance, evacuation planning, and personal safety must always come first.