When cooking fuel is limited, keeping a stove burning for several hours can be wasteful.
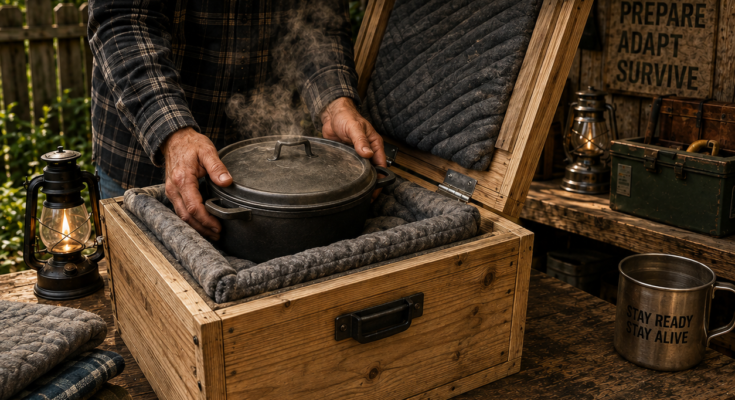
A retained-heat cooker—also called a thermal cooker, fireless cooker, haybox or wonder box—uses insulation to slow the loss of heat from a covered pot. Food is first heated thoroughly on a conventional stove, then the hot vessel is transferred into an insulated enclosure where stored heat continues the cooking process.
The principle is:
Thorough initial heating + tightly covered pot + effective insulation = continued cooking with less fuel
This method can be useful during:
- Electrical outages
- Propane shortages
- Camping trips
- Emergency fuel rationing
- Hot weather when less indoor stove time is desirable
- Everyday preparation of slow-cooking foods
However, this is not a cold-start cooker. The box cannot safely cook raw food on its own, and it does not guarantee that food will remain at a safe temperature.
How Retained-Heat Cooking Works
Food, water and the cooking pot absorb thermal energy while sitting on a working stove.
After the pot is removed, heat begins moving into the cooler surrounding air. Insulation slows this transfer.
The cooking process has three stages:
- Heat the food on a functioning stove.
- Transfer the covered pot immediately into insulation.
- Use retained heat to continue softening and cooking the food.
The method works best when:
- The pot is nearly full.
- The food contains plenty of liquid.
- The pot has a tight-fitting lid.
- The insulation surrounds the vessel closely.
- The box remains closed.
- The initial heating period is sufficient.
- The food is served, reheated or refrigerated promptly.
A small amount of food in a large pot loses heat more quickly because it contains less stored thermal energy and more empty air.
Suitable Foods
Retained-heat cooking works particularly well for moist dishes that normally simmer for an extended period.
Good candidates include:
- Rice
- Lentils
- Split peas
- Dried beans
- Oatmeal
- Barley
- Soups
- Stews
- Pasta sauces
- Boiled grains
- Potatoes cut into even pieces
- Rehydrated shelf-stable meals
Beginners should practice first with lower-risk foods such as rice, oatmeal or lentils.
Exercise greater caution with:
- Raw meat
- Poultry
- Seafood
- Eggs
- Dairy-heavy dishes
- Large roasts
- Whole poultry
- Frozen ingredients
- Very thick foods
- Meals for medically vulnerable people
These foods require reliable temperature control and verification with a food thermometer. When fuel is available, conventional cooking is generally safer for high-risk ingredients.
Food-Safety Risk: The Temperature Danger Zone
Insulation slows cooling, but it does not stop it.
According to USDA food-safety guidance, bacteria can grow quickly between 40°F and 140°F, commonly called the temperature danger zone. Perishable food should not remain within this range for more than two hours, or more than one hour when the surrounding temperature exceeds 90°F.
That means a retained-heat cooker must not be treated like an all-day unattended slow cooker.
If the meal:
- Was not heated sufficiently
- Cooled too quickly
- Sat for an unknown period
- Was repeatedly opened
- Contains raw animal products
- Was left overnight
…it may not be safe.
Smell, appearance and taste cannot reliably identify harmful bacteria.
Choosing the Cooking Pot
The pot is the thermal core of the system.
Look for:
- Heavy construction
- Flat bottom
- Tight-fitting lid
- Heat-resistant handles
- No cracks or severe warping
- A size closely matched to the box
- Material approved for cooking
Suitable choices may include:
- Stainless-steel stockpot
- Enameled cast-iron pot
- Cast-iron Dutch oven
- Heavy aluminum cooking pot
- Commercial thermal-cooker insert
Cast iron retains heat well but is extremely heavy and can burn the user or damage the box. Enameled cookware must be handled carefully to prevent chipping.
Avoid:
- Glass cookware not approved for this use
- Pots with loose lids
- Plastic handles with questionable temperature ratings
- Pressure cookers kept under pressure inside the box
- Damaged nonstick cookware
- Containers not designed for cooking
Never close or obstruct a pressure cooker’s vent and place it inside insulation while pressurized.
Choosing the Insulation
The image shows padded fabric surrounding the pot. Insulation must tolerate the vessel’s surface temperature without melting, smoking or releasing hazardous fumes.
Possible materials include:
- Wool blankets
- Purpose-made high-temperature insulating pads
- Cotton quilts made without synthetic foam
- Mineral-wool insulation fully contained behind a protective liner
- Commercial fireless-cooker cushions
- Clean, dry natural-fiber filling inside washable covers
Avoid direct contact between a very hot pot and:
- Polystyrene foam
- Plastic bubble insulation
- Vinyl
- Unknown synthetic upholstery foam
- Flammable loose paper
- Sawdust
- Dry grass
- Plastic tarps
- Materials treated with chemicals
- Anything contaminated by oil or fuel
Traditional “hayboxes” used hay, but loose dry plant material beside a hot vessel creates contamination and fire concerns. Modern, contained, heat-resistant insulation is a better option.
Check every material’s temperature rating before use.
Two Practical Designs
Soft insulated basket
A padded basket or fabric shell surrounds the pot.
Advantages:
- Lightweight
- Portable
- Easy to store
- Less woodworking
- Can fit several pot shapes
Limitations:
- Can tip
- May be difficult to clean
- Fabric can touch hot handles
- Provides limited impact protection
Rigid insulated box
A wooden or metal outer enclosure contains fitted insulation and a protected inner lining.
Advantages:
- Stable
- Protects the pot
- Easier to fit securely
- Can include handles and a latched lid
Limitations:
- Heavier
- Requires more materials
- Wood needs separation from the hot vessel
- A poorly designed box can trap moisture or overheat materials
The rigid design is usually better for preparedness storage if it is constructed with appropriate heat-resistant materials.
Materials for a Rigid Cooker
Exact dimensions depend on the pot.
Outer enclosure
- Exterior-grade or furniture-grade plywood
- Solid lumber for corner supports
- Wood screws
- Carrying handles
- Strong hinges
- Mechanical lid latch
- Exterior wood finish
- Rubber feet
Interior assembly
- Heat-resistant liner
- Temperature-rated insulation
- Removable washable inner cover
- Fitted bottom cushion
- Side insulation panels
- Fitted top cushion
- Noncombustible support beneath the pot
- Optional metal drip tray
- Probe-thermometer opening
Tools
- Tape measure
- Carpenter’s square
- Saw
- Drill
- Screwdrivers
- Stapler where appropriate
- Clamps
- Sandpaper
- Utility knife
- Work gloves
- Safety glasses
- Food thermometer
- Infrared thermometer for surface testing
Do not depend only on an infrared thermometer for food safety. It measures surface temperature, while a probe thermometer measures inside the food.
Step 1: Measure the Pot
Measure the pot’s:
- Maximum body diameter
- Height with lid
- Width across the handles
- Height of the lid handle
- Weight when full
Allow space for insulation around:
- The bottom
- Both sides
- The top
- Handles and lid knob
The insulation should fit closely without forcing the lid or placing pressure on fragile handles.
Design the cooker around one specific pot. Excess empty space reduces performance.
Step 2: Determine the Box Dimensions
A basic design needs:
- Strong exterior walls
- Several inches of insulation
- A fitted pot cavity
- Enough clearance for safe lifting
- A lid thick enough for top insulation
The exact insulation thickness depends on its thermal performance and temperature rating. More insulation usually slows heat loss, but additional thickness also makes the box larger.
Do not let the full pot sit directly on thin plywood. Provide a suitable heat-resistant, weight-bearing base.
Step 3: Build the Outer Box
Construct a square and rigid enclosure.
Basic process:
- Cut the base and side panels.
- Assemble the walls around structural corner supports.
- Fasten with screws.
- Install the hinged lid.
- Fit the latch.
- Add carrying handles.
- Sand sharp edges.
- Apply an exterior finish.
- Allow the finish to cure completely.
- Confirm that the box can support the filled pot.
Do not use interior coatings that soften or release strong odors when heated.
The latch should keep the lid closed but must not compress the pot lid or lock so securely that emergency access becomes difficult.
Step 4: Install the Heat-Resistant Liner
The insulation should not shed fibers into the cooking area.
Install an interior barrier that is:
- Heat resistant
- Cleanable
- Smooth
- Mechanically secured
- Free from sharp edges
- Appropriate near cookware
If using mineral wool, fully contain it so fibers cannot enter food or attach to the pot.
Do not assume that ordinary adhesive remains safe at elevated temperatures. Mechanical fasteners may be more reliable when properly isolated.
Step 5: Create the Bottom Support
The bottom must carry the weight of a full pot while reducing heat transfer into the wooden structure.
Use a suitable combination of:
- Noncombustible load-spreading plate
- Temperature-rated insulation
- Removable insulating cushion
- Metal drip tray
The pot must remain level. A tilted pot can spill when opened or lifted.
Test the support with a pot filled with cold water before conducting a hot test.
Step 6: Fit the Side Insulation
Pack fitted insulation around the pot cavity without leaving large gaps.
The insulation should:
- Surround the pot evenly
- Remain clear of anything likely to melt
- Avoid interfering with the lid
- Permit safe access to handles
- Be removable for inspection
- Stay dry
- Resist compression
Do not pack loose material so tightly that it places force on the pot or makes removal dangerous.
A fabric-covered insert shaped to the chosen vessel is easier to handle and clean than loose insulation.
Step 7: Make the Top Cushion
Heat rises, so the top needs substantial insulation.
The top cushion should:
- Fill the space above the pot
- Avoid pressing the lid open
- Stay clear of steam vents
- Be removable
- Have a washable cover
- Use temperature-rated filling
Never place insulation over a pressurized vent, rattling weight or safety valve.
The cooking vessel should be an ordinary closed pot operating without pressure.
Step 8: Add a Thermometer Access Point
A food thermometer makes the method much safer.
A small protected access route can allow a probe to reach the food without fully opening the box. The opening should be:
- Just large enough for the probe
- Positioned so it does not damage the lid
- Protected from sharp edges
- Closed when not in use
- Kept clean
A wireless food thermometer may work if its probe and cable are approved for the temperatures involved.
Do not drill or modify the cooking pot lid unless the manufacturer approves it.
Step 9: Perform an Empty Heat Test
Before using food, test the materials.
- Heat water in the chosen pot.
- Turn off the stove.
- Let violent boiling settle.
- Close the pot securely.
- Transfer it using insulated gloves.
- Close the cooker.
- Monitor the exterior and interior temperatures.
- Check for smoke, odor, softening or discoloration.
- Stop the test if any material overheats.
- Allow everything to cool before inspection.
Never leave the first hot test unattended.
If you smell melting plastic, scorched wood or chemicals, remove the cooker from use and replace the unsuitable material.
Step 10: Test Heat Retention With Water
A controlled water test establishes realistic performance.
Record:
- Water volume
- Starting temperature
- Room temperature
- Temperature after 30 minutes
- Temperature after one hour
- Temperature after two hours
- Temperature after four hours
Example test log:
| Time | Water temperature | Room temperature | Notes |
|---|---|---|---|
| Start | Pot transferred | ||
| 30 minutes | |||
| 1 hour | |||
| 2 hours | |||
| 4 hours |
Repeat the test under colder conditions if the cooker might be used outdoors or during winter outages.
Do not assume another person’s cooking times will apply to your pot, food volume and insulation.
General Cooking Method
1. Prepare the ingredients
Cut ingredients into even pieces. Soak dried beans beforehand when the recipe requires it.
Avoid beginning with frozen ingredients. They reduce the temperature of the entire pot and may prevent safe heating.
2. Fill the pot appropriately
A mostly full pot retains heat better than a nearly empty one, but leave enough room to prevent boiling over.
Follow the pot manufacturer’s maximum-fill guidance.
3. Heat on a functioning stove
Bring the complete contents to the required temperature. Stir thick foods so the center heats evenly.
For many liquid dishes, this means reaching a strong boil, then continuing to simmer for a recipe-specific period.
Merely heating the surface is insufficient.
4. Cover tightly
Place the lid on securely. Avoid opening it again before transfer.
5. Transfer immediately
Turn off the stove and use dry, insulated gloves to move the hot pot directly into the cooker.
Do not carry it across a cluttered room.
6. Seal the insulation
Fit the side and top insulation, then close and latch the box.
7. Leave it closed
Opening the cooker releases stored heat. Check only when required for temperature verification.
8. Verify before serving
Measure the internal temperature in several areas, especially when cooking meat or a thick dish.
If the food is below a safe temperature or not fully cooked, return it to the stove and bring it back to an appropriate boil or safe internal temperature.
Cooking Rice
Rice is a good beginner project.
A general method is:
- Use the rice-to-water ratio appropriate for the variety.
- Bring the water and rice to a full boil.
- Stir to prevent sticking.
- Simmer briefly with the lid on.
- Transfer immediately to the insulated box.
- Leave the box closed.
- Check texture and temperature at the planned time.
- Reheat conventionally if the rice is undercooked.
Cooked rice requires careful handling because spores of Bacillus cereus can survive cooking and multiply if rice remains warm for too long.
Serve it promptly or cool it quickly for refrigeration. Do not leave rice sitting lukewarm in the box for many hours.
Cooking Dried Beans
Some beans require special preparation.
Kidney beans contain naturally occurring phytohaemagglutinin, which can cause illness if the beans are raw or undercooked. Slow or low-temperature heating is not adequate.
For dried kidney beans:
- Soak appropriately.
- Discard the soaking water.
- Use fresh water.
- Bring the beans to a vigorous boil.
- Maintain the required boiling period before insulated cooking.
- Confirm they are fully cooked before eating.
Do not place soaked raw beans directly into the insulated cooker with merely warm water.
Canned beans are simpler and safer for emergency meals because they are already cooked.
Cooking Meat, Poultry and Seafood
These foods require extra caution.
USDA minimum internal-temperature guidance includes:
- Poultry: 165°F
- Ground meats: 160°F
- Beef, pork, veal and lamb steaks or roasts: 145°F, followed by the recommended rest time
- Leftovers: 165°F
Check current USDA guidance for the specific food.
A retained-heat box may not maintain sufficient heat throughout large pieces of meat. For preparedness cooking, choose small, evenly cut pieces and verify the temperature at multiple locations—or cook animal products completely using a conventional heat source.
Never partially cook meat, let it cool, and plan to finish it much later.
Keeping Food Hot
For hot holding, keep cooked food at 140°F or above.
If the temperature falls below 140°F:
- Determine how long it has been below that point.
- Reheat promptly to the appropriate temperature when still within safe time limits.
- Discard it if the time is unknown or exceeds public-health guidance.
Do not repeatedly warm and cool the same pot.
During an outage, refrigeration may also be unavailable, making prompt consumption especially important.
Preventing Burns
A well-insulated pot may remain dangerously hot even when the box exterior feels cool.
Use these precautions:
- Warn everyone that the cooker contains a hot vessel.
- Keep it away from children and pets.
- Place it on a stable, level surface.
- Keep the travel path clear.
- Use dry oven mitts.
- Lift with both hands.
- Open the pot lid away from your face.
- Expect steam.
- Do not place the cooker on a bed or sofa.
- Do not move it while someone is opening the lid.
Wet cloth conducts heat quickly and can cause burns. Always use dry protective gloves.
Common Mistakes
Putting cold food in the box
Insulation does not create cooking heat.
Heating only until warm
The entire dish must reach the necessary initial temperature.
Using too little food in a large pot
A nearly empty pot cools faster.
Opening the box repeatedly
Every inspection releases heat.
Leaving the food overnight
Extended time at unsafe temperatures can allow bacteria to multiply.
Using synthetic foam near the pot
Some foams melt, smoke or release fumes.
Using loose hay indoors
Dry plant material can introduce dust, pests, mold and fire risk.
Cooking large pieces of meat
The center may not heat or remain hot enough.
Trusting the clock alone
Temperature is more important than an estimated cooking time.
Believing reheating fixes everything
Some bacteria can produce toxins that reheating may not reliably destroy.
Maintenance
After every use
- Remove the pot.
- Check for spills.
- Wash removable covers.
- Dry the interior completely.
- Inspect for scorched areas.
- Check hinges and latches.
- Look for compressed insulation.
- Store with the lid slightly open until completely dry.
Monthly during regular use
- Inspect for mold.
- Check for insects or rodents.
- Confirm insulation remains evenly distributed.
- Examine the liner.
- Tighten loose hardware.
- Repeat a water-retention test if performance changes.
Before emergency storage
- Clean and dry all parts.
- Store the dedicated pot with the cooker.
- Add a food thermometer.
- Include oven mitts.
- Include printed cooking instructions.
- Keep safe emergency recipes with the system.
Emergency Cooking Checklist
Before heating
- Pot and lid are undamaged
- Food begins refrigerated, shelf-stable or properly thawed
- Ingredients are cut evenly
- Sufficient cooking liquid is present
- Food thermometer works
- Insulated box is dry and clean
- Stove fuel is adequate
Before transferring
- Entire dish has reached the required temperature
- Food has boiled or simmered for the recipe-specific time
- Pot lid is secure
- Carrying route is clear
- Dry oven mitts are ready
- Insulation shows no damage
Before eating
- Final temperature has been checked
- Meat is fully cooked
- Food has not remained lukewarm for an unknown period
- No unusual odor or contamination is present
- Leftovers can be refrigerated promptly
- Questionable food is discarded
Is a Retained-Heat Cooker Worth Building?
It can be valuable when:
- Cooking fuel is limited.
- You regularly prepare grains, beans or soups.
- The cooker has been tested beforehand.
- A food thermometer is available.
- Someone can monitor cooking time.
- The pot fits the insulation correctly.
- Safe refrigeration or prompt serving is possible.
It may not be appropriate when:
- You need completely unattended cooking.
- The household lacks a thermometer.
- The only available insulation is flammable or heat-sensitive.
- Meals contain large pieces of raw meat.
- Food must remain inside overnight.
- Users cannot safely lift a heavy hot pot.
- Exact temperature control is medically important.
A commercial vacuum-insulated thermal cooker may provide more predictable performance than a homemade box, but it still requires proper initial heating and safe food handling.
Final Takeaway
An insulated cooker can reduce the amount of fuel required to prepare rice, beans, soup, oatmeal and other moist foods during a power outage.
The box does not generate heat. It only preserves some of the heat already placed into the food.
Safe use depends on:
- Thorough initial cooking
- A nearly full covered pot
- Temperature-rated insulation
- Fast transfer from the stove
- Minimal opening
- Food-temperature monitoring
- Prompt serving or refrigeration
- Conventional reheating when necessary
Never place raw food in a cold insulated box and expect it to cook safely. Never leave perishable food inside overnight. Never rely on appearance or smell to determine whether lukewarm food is safe.
Save fuel by retaining heat—but verify the temperature before serving the meal.