When an outage, broken water main, severe storm, or remote campsite leaves you without a reliable faucet, rainfall can become a useful supplemental water source.
You do not necessarily need a roof, gutter, or permanent rain barrel. A clean tarp stretched between four supports can form a temporary catchment surface that funnels rain into a bucket or larger storage container.
The principle is simple:
Clean collection surface + controlled slope + covered container = captured rainwater
However, collected rainwater is not automatically safe to drink. Rain can pick up contaminants from:
- Dust and smoke in the air
- Bird and insect droppings
- Dirty tarp surfaces
- Unwashed ropes and hardware
- Hands and tools
- Soil splashing into the container
- Chemicals in the tarp
- Previously contaminated storage vessels
Use captured rainwater directly for appropriate nonpotable purposes. If it must be used as emergency drinking water, it requires suitable collection materials, careful handling and an effective treatment method.
What This System Can Be Used For
Untreated rainwater may be useful for:
- Flushing toilets
- Washing tools
- Cleaning outdoor equipment
- Watering suitable plants
- Initial cleaning before disinfection
- Emergency sanitation
- Extinguishing small outdoor fires when safe
- Supplying water for later treatment
Do not automatically use untreated rainwater for:
- Drinking
- Brushing teeth
- Preparing food
- Washing produce
- Making ice
- Cleaning eating utensils
- Mixing infant formula
- Filling medical devices
- Giving to pets
People with weakened immune systems, pregnant people, young children and older adults can be especially vulnerable to waterborne illness.
How Much Water Can a Tarp Collect?
One inch of rain falling on one square foot produces approximately 0.623 gallons of water.
Use this estimate:
Gallons collected=Tarp area in square feet×Rainfall in inches×0.623×Efficiency\text{Gallons collected} = \text{Tarp area in square feet} \times \text{Rainfall in inches} \times 0.623 \times \text{Efficiency}
A 10-by-10-foot tarp has a theoretical collection area of 100 square feet.
During one inch of rain:
100×1×0.623=62.3 gallons100\times1\times0.623=62.3\text{ gallons}
Actual collection will be lower because water may:
- Blow from the tarp
- Remain in folds
- Splash past the container
- Leak through seams
- Be discarded during initial rinsing
- Overflow the storage vessel
If the system captures 70% of the theoretical amount:
62.3×0.70≈43.6 gallons62.3\times0.70\approx43.6\text{ gallons}
A five-gallon bucket could therefore overflow quickly during heavy rain. Plan overflow before leaving the system unattended.
Recommended Materials
Basic structure
- Four sturdy metal fence posts or structural supports
- Clean, waterproof tarp
- UV-resistant rope or paracord
- Adjustable tensioning knots or suitable tensioners
- Ground stakes or anchors where needed
- Protective caps for exposed posts
- Clean outlet fitting or funnel
- Food-grade collection bucket or storage container
- Tight-fitting lid
- Fine inlet screen
- Overflow hose
- Additional covered containers
Useful tools
- Measuring tape
- Work gloves
- Safety glasses
- Rubber mallet or post driver
- Level
- Scissors or utility knife
- Pliers
- Cord locks or carabiners
- Clean brush
- Unscented soap suitable for the tarp
- Water-treatment equipment
- Waterproof labels
Do not use a container that previously held fuel, pesticides, paint, solvents or unidentified chemicals—even if it has been washed.
Choosing the Tarp
The tarp is the collection surface, so its material matters.
For water that may eventually receive drinking-water treatment, choose:
- A new or thoroughly cleaned tarp
- Material identified as suitable for potable-water contact when available
- A tarp free from peeling coatings
- A surface without chemical odor
- A light-colored tarp when possible
- A size that can be safely tensioned
- Reinforced corners and grommets
Avoid:
- Old construction tarps
- Tarps exposed to pesticides
- Moldy material
- Painted canvas
- Pressure-treated fabric
- Tarps with unknown industrial use
- Material contaminated by animal waste
- Torn or deteriorating plastic
“Waterproof” does not mean “food-safe.” If the manufacturer does not approve contact with drinking water, reserve the collected water for nonpotable use unless no safer emergency source exists and proper treatment guidance is followed.
Choosing the Collection Location
Select a location that is:
- Open to rainfall
- Away from overhanging branches
- Away from bird roosts
- Uphill from septic or waste areas
- Away from chemical storage
- Clear of electrical lines
- Protected from vehicles
- Stable in wind
- Accessible for monitoring
- High enough to position a container beneath the outlet
Do not place the system:
- Under a roof edge
- Beneath a treated wooden deck
- Near a chimney
- Beside pesticide spraying
- Below a heavily trafficked road when avoidable
- In a drainage ditch
- Where livestock can reach it
- Where children could become tangled in ropes
- Where stakes create an unseen trip hazard
Step 1: Determine the Collection Goal
Before building, decide:
- How much water is needed?
- Will it be used as drinking water or utility water?
- How much rain is forecast?
- How many containers are available?
- Where will overflow go?
- How long will the water be stored?
- Can the structure be supervised during wind?
For emergency drinking needs, public-health guidance commonly recommends planning for at least one gallon per person per day, with more required in hot climates, during illness or for hygiene.
A tarp system should supplement stored water—not replace a prepared supply of commercially bottled or properly stored drinking water.
Step 2: Lay Out the Four Supports
Place four posts in a square or rectangle slightly larger than the usable tarp area.
The finished tarp needs:
- Three or four elevated corners
- A controlled low collection point
- Enough slope for drainage
- Sufficient clearance above the bucket
- Space for ropes and anchors
Measure diagonally between opposite corners. Equal diagonal measurements help confirm that the layout is square.
Check below-ground utility locations before driving posts.
Step 3: Install the Posts
Drive the posts deeply enough to remain stable under the expected load.
Remember that a rain-filled tarp can become surprisingly heavy. One gallon of water weighs approximately 8.34 pounds. If ten gallons temporarily pool on the tarp, the supports may experience more than 83 pounds of water weight, plus wind and rope tension.
Posts must not:
- Lean excessively
- Pull out under hand pressure
- Have sharp exposed tops
- Contact power lines
- Depend on shallow, loose soil
- Create a hazardous walking path
Install protective caps over sharp metal posts.
A temporary freestanding frame may be safer where posts cannot be driven, but it must be anchored against wind.
Step 4: Clean the Tarp and Container
Before assembly:
- Shake loose dirt from the tarp.
- Wash both sides using an appropriate cleaner.
- Rinse thoroughly with safe water.
- Allow it to dry on a clean surface.
- Wash the bucket and lid.
- Sanitize containers intended for potable-water storage.
- Keep cleaned surfaces away from soil.
Do not clean potable-water equipment with scented detergent that may leave residue.
Follow CDC or local public-health instructions for sanitizing water-storage containers.
Step 5: Attach the Tarp Without Damaging It
Tie each corner to a support using reinforced grommets or tarp clips.
Do not pass a thin rope directly through weak plastic where it can tear.
Use:
- Reinforced grommets
- Smooth carabiners
- Broad tarp clips
- Adjustable guy lines
- Elastic tensioners only where suitable
Keep rope ends secured so they cannot whip in wind.
Initially leave the tarp loose enough to shape. Final tensioning happens after the outlet position is established.
Step 6: Form the Collection Slope
The tarp must direct water toward one predictable low point.
Two practical configurations are available.
Corner outlet
Set three corners higher and one corner lower. Water travels toward the low corner and drains into the container.
Advantages:
- Simple construction
- No hole required
- Easy to adjust
- Lower risk of tearing the tarp’s center
Disadvantages:
- More vulnerable to wind loss
- Water can run along the edge or rope
- Bucket position may be awkward
Center outlet
Keep the corners elevated while lowering the center into a shallow funnel.
Advantages:
- Captures water from all directions
- Bucket can remain beneath the center
- Less water runs from the edges
Disadvantages:
- Pooling can overload the tarp
- Improvised punctures may tear
- The outlet needs reinforcement
- Cleaning is more difficult
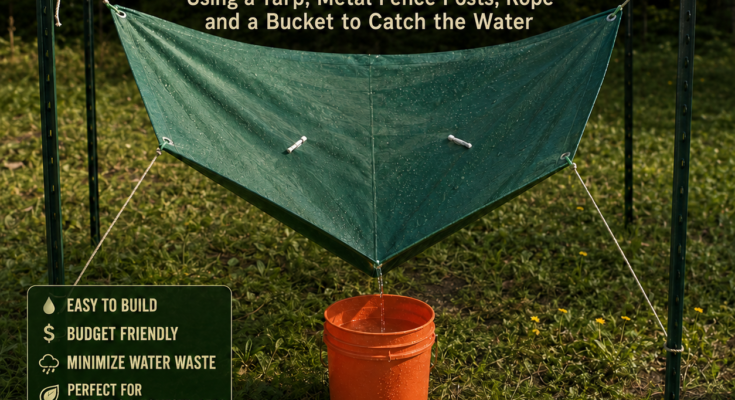
The image shows a center-style collector. For a reusable system, use a purpose-built reinforced tarp outlet rather than cutting an unsupported hole.
Step 7: Create a Safe Outlet
A simple outlet may use:
- Reinforced tarp drain fitting
- Bulkhead fitting designed for flexible material
- Smooth food-grade funnel
- Clean flexible tubing
- Clamped discharge spout
The outlet must:
- Remain above the bucket
- Drain without large pools
- Resist tearing
- Be easy to clean
- Keep dirty hardware away from the water
- Prevent water from following the underside of the tarp
Do not use lead-containing fittings, corroded metal, greasy hardware or previously used chemical tubing.
If you do not have a suitable outlet fitting, a carefully formed low corner may be safer than cutting the tarp.
Step 8: Add a Debris Screen
Place a fine, clean screen over the container opening or inlet.
The screen can reduce:
- Leaves
- Twigs
- Insects
- Seeds
- Large debris
It does not remove:
- Bacteria
- Viruses
- Parasites
- Dissolved chemicals
- Fine smoke particles
- Pesticides
- Heavy metals
Screening is only pretreatment. It does not make rainwater safe to drink.
Secure the screen so it cannot fall into the container or blow away.
Step 9: Rinse the Catchment Before Collecting
Dust, insects and droppings may settle on the tarp between storms.
When possible:
- Inspect the tarp before rainfall.
- Remove visible contamination.
- Allow the first rainfall to rinse the surface.
- Divert or discard the initial runoff.
- Move the outlet over the clean container afterward.
A tarp-based collector can use a manual diverter—such as directing the low corner away from the container during the initial rinse.
The amount to discard depends on contamination and the collection area. No simple first-flush amount guarantees safe water.
If the tarp contains bird droppings, chemical residue, dead animals, mold or heavy contamination, clean and disinfect it before use rather than relying on rain alone.
Step 10: Prevent Overflow
A five-gallon bucket can fill in minutes during heavy rainfall.
Use one of these methods:
- Watch the bucket and replace it when full.
- Connect multiple covered containers.
- Install a screened overflow hose.
- Drain overflow away from foundations.
- Use a larger food-grade barrel.
- Temporarily reduce catchment area.
The overflow outlet should direct water:
- Away from buildings
- Away from walkways
- Away from septic areas
- Away from neighboring property
- Where it will not cause erosion
Never seal the container completely while water is entering. Air must escape.
Step 11: Stabilize the System Against Wind
A tarp acts like a sail.
Strong wind can:
- Pull posts from the soil
- Tear grommets
- Launch the tarp
- Spill the container
- Create dangerous whipping ropes
- Drive dirty runoff into the bucket
To reduce risk:
- Keep the structure reasonably low.
- Use strong anchors.
- Tension the tarp evenly.
- Avoid large unsupported areas.
- Remove it before severe wind.
- Inspect ropes regularly.
- Do not attach it to weak fences, gutters or tree limbs.
- Never stand beneath a heavily pooled tarp.
Rainwater collection should not take priority over personal safety during lightning, high wind, flash flooding or severe storms.
Treating Rainwater for Emergency Drinking
The safest option is to use commercially bottled water or water stored before the emergency.
If authorities advise that rainwater must be treated for drinking, use guidance from the CDC, EPA or local public-health agency.
Step 1: Clarify cloudy water
If the water is cloudy:
- Allow sediment to settle.
- Pour the clearer water through a clean cloth, paper coffee filter or appropriate prefilter.
- Collect it in a clean container.
This improves appearance but does not disinfect the water.
Step 2: Disinfect
Boiling is generally the most dependable household method for killing disease-causing organisms.
CDC emergency guidance advises bringing clear water to a rolling boil for one minute, or three minutes at elevations above 6,500 feet, then cooling it naturally in a clean, covered container.
If boiling is impossible, correctly dosed unscented household chlorine bleach may be used when the product’s label and current public-health guidance allow it. Bleach concentration varies, so do not guess the dose.
What boiling cannot remove
Boiling does not reliably remove:
- Fuel
- Pesticides
- Solvents
- Heavy metals
- Many industrial chemicals
- Certain algal toxins
Boiling can concentrate some nonvolatile contaminants as water evaporates.
Water suspected of chemical contamination should not be consumed simply because it has been boiled or chlorinated.
Storing the Collected Water
Use a container that is:
- Food-grade
- Clean and sanitized
- Tightly covered
- Opaque or protected from sunlight
- Clearly labeled
- Kept in a cool location
- Raised away from floodwater
- Protected from animals and insects
Label it with:
- Collection date
- Source
- “Untreated” or “Treated”
- Intended use
- Treatment method
Never dip dirty cups or hands into stored water. Use a clean spigot, pump or pouring container.
If treated water develops an unusual odor, color, surface film or visible growth, do not assume another round of boiling will correct every problem.
Uses for Untreated Rainwater
Clearly labeled untreated water may reduce consumption of potable supplies by supporting:
- Toilet flushing
- Preliminary cleaning
- Outdoor equipment washing
- Irrigation
- Dust control
- Washing muddy footwear
Use caution with edible gardens. Avoid splashing questionable water onto produce that will be eaten raw, especially close to harvest.
Do not store untreated rainwater inside beverage containers where someone could mistake it for drinking water.
Common Building Mistakes
Making the tarp completely flat
Water pools unpredictably and may collapse the structure.
Cutting an unsupported center hole
The opening may enlarge rapidly under load.
Using weak tent stakes
The tarp can pull them out during wind or heavy rain.
Collecting into an open bucket
Insects, leaves, animals and debris can enter.
Assuming clear water is safe
Many harmful microorganisms and chemicals are invisible.
Using an old chemical container
Some residues cannot be made safe through ordinary washing.
Letting ropes rub against sharp metal
Abrasion can cause sudden structural failure.
Leaving the system unattended
Overflow, wind or pooling may damage the equipment.
Allowing water to stagnate
Warm standing water can support microbial growth and insects.
Depending on the system as the only water source
Rainfall is unpredictable. Stored water should remain the primary emergency supply.
Maintenance Checklist
Before each storm
- Tarp is clean
- No bird or animal waste is present
- Posts are stable
- Ropes show no damage
- Grommets are intact
- Outlet is clean
- Screen is installed
- Container is sanitized
- Overflow route is clear
- Strong wind is not forecast
During collection
- First dirty runoff is diverted
- Tarp drains without deep pooling
- Container remains upright
- Screen stays in position
- Overflow does not threaten the house
- Nobody handles equipment during lightning
- Water is labeled immediately
After collection
- Water is covered
- Intended use is marked
- Drinking water receives proper treatment
- Tarp is rinsed and dried
- Container exterior is cleaned
- Ropes and hardware are inspected
- Equipment is stored away from chemicals
Is This Project Worth Building?
A tarp rain collector can be valuable when:
- You need temporary utility water.
- No roof catchment exists.
- Rainfall is reasonably frequent.
- The system can be monitored.
- Clean materials are available.
- Water can be stored safely.
- A reliable treatment method is available.
- You understand its limitations.
It is less useful when:
- Rainfall is rare or unpredictable.
- Strong winds accompany storms.
- Clean containers are unavailable.
- The site has heavy air pollution.
- Chemical contamination is possible.
- The household has no way to treat water.
- A permanent gutter-and-barrel system would be more practical.
- Local laws restrict rainwater collection.
Check local rainwater-harvesting and plumbing rules before constructing a permanent system.
Final Takeaway
A tarp, four supports and a bucket can capture a surprising amount of rainwater. The project is inexpensive, portable and useful for emergency sanitation, gardening and other nonpotable needs.
Its success depends on more than simply stretching plastic between posts:
- The tarp must be clean and suitable.
- The supports must withstand water weight and wind.
- The surface must drain toward one outlet.
- Initial dirty runoff should be diverted.
- The container must be food-grade and covered.
- Overflow must be controlled.
- Drinking water must be appropriately treated.
- Chemically contaminated water must not be consumed.
Catch the rain—but never confuse collected water with confirmed safe drinking water.