
Sunlight can do more than produce electricity.
A solar thermal collector captures the sun’s heat directly and transfers it into water or another heat-transfer fluid. When conditions are favorable, even a relatively small collector can preheat water for washing, cleanup, outdoor showers, or delivery to a conventional water heater.
The basic principle is:
Sunlight + dark absorber + tubing + insulated storage = solar-heated water
However, a sealed collector sitting in full sunlight can become much hotter than many people expect. An incorrectly built system may produce:
- Scalding water
- Steam
- Dangerous pressure
- Split tubing
- Leaking joints
- Contaminated drinking water
- Freeze damage
- Bacterial growth in stagnant warm water
- Structural problems from a heavy rooftop tank
- Damage to pumps and valves
The system shown in the reference image explains the general idea, but it leaves out important safety components. A household solar water heater should not be constructed by connecting a copper coil to an improvised sealed metal container.
This guide separates the project into two realistic options:
- A small, nonpressurized experimental collector for learning or limited utility-water use
- A code-compliant domestic preheating system using rated tanks, approved controls, and professional plumbing
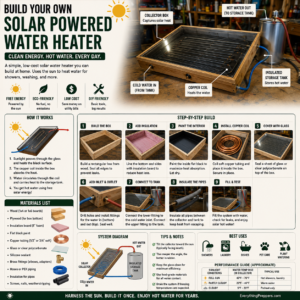
How a Solar Water Heater Works
A basic system contains two main elements:
- A solar collector that absorbs heat
- An insulated tank that stores heated water
ENERGY STAR notes that solar water heaters use collectors and storage tanks and require a backup system for cloudy periods or times of high demand. ENERGY STAR solar water heaters
Inside the collector:
- Sunlight passes through transparent glazing.
- A dark absorber converts sunlight into heat.
- Tubing collects heat from the absorber.
- Water or heat-transfer fluid becomes warmer.
- The heated fluid travels toward storage.
- Cooler fluid returns to the collector.
The transparent cover reduces heat loss to outside air, while insulation beneath and around the absorber reduces heat escaping through the box.
Three Common Solar-Water-Heating Designs
Direct circulation system
Household water flows directly through the solar collector.
Advantages include:
- Fewer components
- No separate heat exchanger
- Good heat transfer
- Relatively simple operation
Disadvantages include:
- Freeze vulnerability
- Scale buildup inside the collector
- Potable-water material requirements
- Greater overheating and stagnation concerns
- Collector exposure to household water pressure
A direct system is generally limited to climates without meaningful freeze risk and must comply with local plumbing requirements.
Indirect closed-loop system
A separate heat-transfer fluid circulates through the collector. Heat passes into domestic water through a heat exchanger.
Advantages include:
- Better freeze protection
- Separation between collector fluid and drinking water
- Suitability for colder climates
- Controlled system chemistry
Disadvantages include:
- Greater complexity
- Pump and controller requirements
- Expansion tank
- Heat exchanger
- More maintenance
- Need for approved heat-transfer fluid
Only a fluid specifically approved for the solar system and heat-exchanger application should be used. Automotive antifreeze is not appropriate.
Drainback system
When the circulation pump stops, collector fluid drains into a reservoir inside the protected building envelope.
This can provide freeze and overheating protection if the piping:
- Slopes continuously
- Drains completely
- Contains no traps
- Is sized correctly
- Uses a compatible pump
- Is installed according to a proven design
A nearly correct drainback system can still freeze if water remains trapped in one low point.
Thermosiphon Versus Pumped Circulation
Thermosiphon circulation
Warm water becomes less dense and rises. Cooler water becomes denser and moves downward.
A thermosiphon system uses that natural movement without an electric pump.
For it to work correctly:
- The storage tank must normally be above the collector.
- The hot line must rise continuously.
- The cold return must fall continuously.
- Tubing should avoid air traps.
- Flow resistance must remain low.
- Pipe sizes must support natural circulation.
The image shows the tank beside the collector rather than clearly above it. That arrangement may not circulate reliably without a pump.
Pumped circulation
A circulation pump moves fluid through the collector.
A differential controller normally turns the pump on when the collector is warmer than the storage tank and stops it when useful heat is no longer available.
A pumped system may include:
- Collector temperature sensor
- Tank temperature sensor
- Differential controller
- Check valve
- Isolation valves
- Air separator
- Expansion tank
- Pressure-relief valve
- Fill and drain ports
- Flow meter
Do not run the pump continuously without considering nighttime heat loss. After sunset, uncontrolled circulation may move stored heat back into the cool collector.
What This DIY Project Should Be Used For
A carefully built experimental collector may be suitable for:
- Learning about solar thermal energy
- Preheating water before a listed water heater
- Outdoor equipment washing
- Seasonal garden cleanup
- A controlled outdoor washing station
- Demonstrating thermosiphon circulation
- Testing collector performance
- Heating nonpotable utility water
It should not automatically be used for:
- Supplying drinking water
- Feeding a household shower
- Connecting to municipal pressure
- Heating water for infants or medically vulnerable people
- Supplying an unattended rental property
- Operating where freezing is possible without engineered protection
- Replacing a listed household water heater
- Storing warm water for long periods without water-quality management
If the heated water will contact food, skin, dishes, laundry, pets, or plumbing fixtures, use appropriate potable-water components and follow public-health and plumbing requirements.
Critical Safety Issue 1: Scalding
Solar collectors do not stop heating simply because the water has reached a comfortable shower temperature.
During strong sunlight and low water use, collector or storage temperatures can become dangerously high.
Hot water can cause severe burns rapidly, especially for:
- Children
- Older adults
- People with reduced sensation
- People with limited mobility
- Anyone surprised by a sudden temperature change
A domestic system should include an approved thermostatic mixing valve that blends hot and cold water to a safer delivery temperature.
The valve does not make the collector itself cooler. It controls water supplied to fixtures.
If stored water is maintained above 120°F to reduce microbial risk, the CDC advises using thermostatic mixing valves at faucets or showers to reduce scalding danger. CDC water-heater guidance
Never assume water is safe because it felt warm earlier in the day. Measure it.
Critical Safety Issue 2: Pressure and Thermal Expansion
Water expands as it heats.
In a closed plumbing system, that expansion increases pressure. If water becomes trapped between closed valves and continues heating, pressure can rise rapidly.
A safe pressurized system may require:
- A listed pressure-rated storage tank
- Temperature-and-pressure relief valve
- Correctly sized thermal expansion tank
- Pressure gauge
- Check valve arrangement
- Approved discharge piping
- High-temperature limit
- Stagnation-control strategy
Pacific Northwest National Laboratory notes that most domestic solar-water-heating systems are pressurized and require an expansion tank. Robust systems must also account for overheating and stagnation. PNNL solar water-heating maintenance guidance
Never:
- Use an ordinary cooking pot as a pressurized tank.
- Plug a relief-valve opening.
- Install a valve between a tank and its required relief device.
- Cap a relief-valve discharge pipe.
- Reduce the discharge-pipe size.
- Direct hot discharge where it can strike a person.
- Heat a completely sealed container.
An improvised tank may rupture without warning.
Critical Safety Issue 3: Stagnation and Legionella
Warm, stagnant water can support microbial growth.
The CDC reports that Legionella grows best between approximately 77°F and 113°F. Low water movement, declining disinfectant levels, biofilm, and warm temperatures can increase risk. CDC Legionella water guidance
A solar preheating tank may spend many hours within this favorable temperature range during cloudy weather.
Risk reduction may require:
- Maintaining safe storage temperatures
- Limiting water age
- Avoiding dead legs
- Regular flushing
- Keeping components clean
- Delivering preheated water through a conventional backup heater
- Following a water-management plan
- Using professional system design
Do not treat warm water as disinfected water.
Solar heating is not a reliable water-purification method because temperatures and holding times vary throughout the tank and plumbing.
Critical Safety Issue 4: Freezing
A single freeze can split water-filled copper tubing, damage fittings, and destroy a collector.
ENERGY STAR recommends freeze protection when temperatures may fall below approximately 42°F, commonly through a closed-loop antifreeze system or an automatic drainback design. Batch systems are generally unsuitable for climates with distinct winters. ENERGY STAR solar-water-heater guidance
Do not depend only on:
- Pipe insulation
- Black paint
- A slow drip
- Residual daytime heat
- A light bulb
- Weather forecasts
- Manual draining that someone may forget
Even insulated pipes can freeze during a prolonged outage or cold night.
Choose the Safer Build Path
Option A: Nonpressurized experimental collector
This is the better DIY learning project.
The collector draws water from and returns it to an open, vented container. It is not connected to household pressure and is not treated as a potable domestic system.
Possible uses:
- Demonstration
- Temperature testing
- Controlled outdoor utility washing
- Preheating water that will receive appropriate further treatment
The open reservoir must still be:
- Heat resistant
- Stable
- Covered against debris
- Clearly labeled
- Protected from children and animals
- Drained when not in use
- Kept from becoming stagnant
Option B: Domestic solar preheater
This design uses a manufactured, pressure-rated solar storage tank or preheat tank connected to an approved backup water heater.
It should be designed and installed by qualified solar-thermal and plumbing professionals.
A domestic system may require:
- Permits
- Rated collector
- Listed storage tank
- Heat exchanger
- Expansion tank
- Temperature-and-pressure relief
- Backflow protection
- Mixing valve
- Pump
- Differential controller
- Electrical protection
- Roof engineering
- Freeze protection
- Commissioning
The DIY collector box may still help explain the concept, but household integration is not the part to improvise.
Materials for a Small Experimental Collector
Exact dimensions depend on the desired capacity and available location.
Collector enclosure
- Exterior-grade plywood or noncombustible back panel
- Exterior-rated framing lumber
- Corrosion-resistant screws
- Exterior sealant
- Weather-resistant flashing
- Drainage openings
- High-temperature insulation
- Dark absorber plate
- High-temperature flat-black coating
- Tempered solar glazing or suitable high-temperature transparent cover
- Glazing gasket or compatible weatherstripping
- Mechanical glazing retainers
Fluid circuit
- Soft copper tubing or other rated solar-thermal tubing
- Compatible fittings
- Pipe supports
- High-temperature pipe insulation
- Drain valve
- Air vent where appropriate
- Temperature gauges
- Low-pressure circulation pump if needed
- Compatible controller
- Open, vented heat-resistant reservoir for experimental use
Tools
- Measuring tape
- Square
- Drill and bits
- Tubing cutter
- Tubing bender
- Screwdrivers
- Wrenches
- Caulking gun
- Clamps
- Multimeter for pump circuits
- Thermometer
- Pressure-test equipment for rated closed components
- Safety glasses
- Gloves
- Respiratory protection for cutting or coating products
Do not solder near combustible insulation without appropriate fire controls and experience.
Choosing the Collector Tubing
Copper tubing
Copper transfers heat effectively and tolerates high temperatures, but it is expensive and can be damaged by freezing.
It should be:
- Correctly sized
- Properly supported
- Bent without kinking
- Isolated from incompatible metals
- Protected from corrosion
- Joined using approved methods
- Rated for expected temperature and pressure
PEX tubing
Ordinary PEX should not be placed inside a high-temperature glazed collector unless its manufacturer specifically approves the application.
Collector stagnation temperature can exceed the normal rating of some plastic tubing. Excessive heat may soften, weaken, deform, or shorten its life.
PEX may be useful in cooler parts of a properly designed system, but product temperature, pressure, oxygen-barrier, and sunlight limits must be respected.
Black garden hose
Garden hose is not an appropriate permanent domestic solar collector.
It may:
- Degrade in sunlight
- Add taste or chemicals
- Soften under heat
- Burst under pressure
- Grow biofilm
- Fail at fittings
- Be unsuitable for potable water
It may demonstrate solar heating temporarily, but it should not be presented as a durable household hot-water system.
Choosing the Transparent Cover
The glazing admits sunlight while slowing convective heat loss.
Possible materials include:
- Tempered glass rated for the application
- Solar collector glazing
- High-temperature UV-resistant polycarbonate
- Other manufacturer-approved transparent materials
Glass considerations
Ordinary window glass can break from:
- Hail
- Impact
- Thermal stress
- Frame movement
- Improper edge support
Use appropriate safety glazing and provide proper support.
Polycarbonate considerations
Polycarbonate is impact resistant but expands significantly with temperature.
Installation must allow for:
- Thermal movement
- Compatible sealants
- UV exposure
- Correct fastener spacing
- Drainage
- Manufacturer-required orientation
Do not clamp the sheet so tightly that thermal expansion causes buckling or cracking.
Step 1: Determine the Water-Heating Goal
Before cutting lumber, decide:
- How much water is required?
- What starting temperature is expected?
- What final temperature is desired?
- Will the water be potable or nonpotable?
- Will the system operate seasonally?
- Can the site freeze?
- Is natural circulation possible?
- Where will excess heat go?
- What happens when nobody uses hot water?
Energy required can be estimated using:
[
\text{Energy}=\text{Water mass}\times\text{Temperature rise}\times\text{Specific heat}
]
Heating a large tank requires much more energy than warming a few gallons.
A small collector may provide useful preheating without producing a complete day’s household hot water.
Step 2: Evaluate the Solar Location
A suitable collector location should receive direct sun during the hours when heating is most valuable.
Check the site at several times of day for shade from:
- Trees
- Roof edges
- Chimneys
- Utility poles
- Neighboring buildings
- Seasonal vegetation
In the Northern Hemisphere, a generally south-facing orientation often receives strong annual solar exposure. In the Southern Hemisphere, a generally north-facing orientation is typical.
Local latitude, season, roof slope, weather, and desired usage all affect the best angle.
Do not place the collector where reflected glare will create a hazard.
Step 3: Build the Collector Box
Construct a rigid, weather-resistant enclosure.
The box should:
- Support the glazing
- Protect the insulation
- Resist wind
- Drain accidental moisture
- Permit controlled thermal expansion
- Avoid trapping rainwater
- Allow service access
- Support the tubing without movement
Basic process:
- Cut the back panel.
- Build the perimeter frame.
- Fasten the frame squarely.
- Seal exterior joints.
- Provide planned drainage.
- Install flashing where required.
- Dry-fit the glazing.
- Confirm room for insulation and absorber.
- Apply a durable exterior finish.
- Allow coatings to cure.
Wooden collector boxes require regular inspection. Repeated heating, cooling, condensation, and sunlight can damage joints and finishes.
Step 4: Install Insulation
Place high-temperature insulation beneath and around the absorber.
The insulation should be:
- Rated for expected collector temperature
- Moisture resistant where required
- Protected from direct sunlight
- Compatible with the enclosure
- Installed without large gaps
- Kept away from excessive soldering heat
Do not assume every foam board is suitable inside a glazed collector. Some products can soften, shrink, release odors, or become a fire concern at elevated temperatures.
Follow the insulation manufacturer’s temperature limits.
Step 5: Install the Absorber Plate
A metal absorber plate improves heat transfer from the sunlit surface to the tubing.
Possible materials include:
- Copper sheet
- Aluminum sheet
- Purpose-built solar absorber
- Other thermally conductive metal
The tubing should make close thermal contact with the absorber.
Possible professional joining methods include:
- Soldering
- Brazing
- Mechanical clamping
- Conductive adhesive rated for collector temperatures
- Purpose-built absorber channels
Simply placing a round copper coil loosely on a black plywood base creates poor thermal contact.
Apply an appropriate high-temperature dark selective coating or flat-black finish. Ordinary indoor paint may blister or release strong odors.
Step 6: Form and Secure the Tubing
A serpentine pattern can distribute water across the collector.
When bending copper:
- Unroll it carefully.
- Use a proper tubing bender.
- Maintain the minimum bend radius.
- Avoid flattening curves.
- Support the tube at regular intervals.
- Leave room for thermal expansion.
- Keep joints accessible where possible.
- Protect tubing where it passes through the box.
A coiled spiral may create different flow resistance and air-removal behavior than a serpentine grid. Choose the layout as part of the circulation design.
Do not bury unnecessary couplings inside the collector.
Step 7: Create Inlet and Outlet Penetrations
The cooler inlet is generally located toward the lower portion of the collector. The warmer outlet is generally located toward the upper portion so rising heat and air can move appropriately.
Each penetration should include:
- Protective sleeve or grommet
- Mechanical support
- Weather sealing
- Space for thermal movement
- Pipe insulation outside the collector
Do not allow the pipe’s weight to hang from a soldered joint.
Step 8: Pressure-Test the Absorber Before Glazing
Test the tubing before the collector is sealed.
The test method must match:
- Tubing material
- Fittings
- Expected operating pressure
- Local plumbing requirements
- Manufacturer instructions
A professional may use water or another approved test method.
Compressed-gas testing can store dangerous energy. Do not improvise a high-pressure air test.
During a water test:
- Fill the tubing.
- Remove trapped air where possible.
- Inspect every connection.
- Monitor pressure with the correct gauge.
- Maintain the required test condition.
- Check for moisture or pressure loss.
- Repair and retest.
- Drain or protect the system from freezing.
Never install glazing over a leaking absorber.
Step 9: Install the Glazing
Clean the absorber and interior first.
Then:
- Install compatible gasket material.
- Place the glazing carefully.
- Use mechanical retainers.
- Allow expansion clearance.
- Seal against rain.
- Preserve required drainage or ventilation details.
- Protect all sharp edges.
- Confirm that the glazing cannot lift in wind.
Do not rely on silicone alone to hold a heavy glass panel.
Step 10: Mount the Collector
A filled collector is heavier than it appears. Wind can also apply substantial uplift and lateral force.
The mounting system must attach to structural material—not only:
- Roof shingles
- Thin siding
- Fascia
- Decorative trim
- Weak masonry veneer
Roof installation may require:
- Structural review
- Code-approved flashing
- Wind-load calculation
- Corrosion-resistant hardware
- Roof penetrations
- Safe service access
- Fall protection
A ground-mounted rack is often easier to inspect, drain, clean, and repair.
Keep the collector away from play areas and places where broken glazing or hot pipes could injure someone.
Step 11: Position the Storage Tank
For a thermosiphon system, the tank normally needs to be above the collector.
The supporting structure must account for water weight:
[
1\text{ U.S. gallon of water}\approx8.34\text{ pounds}
]
A 40-gallon tank holds approximately:
[
40\times8.34=333.6\text{ pounds of water}
]
That does not include the tank, piping, insulation, or support frame.
Do not place a heavy tank on a roof, shelf, or platform without structural verification.
For a household system, use a listed solar storage or preheat tank. Do not pressurize a homemade tank.
Step 12: Connect a Thermosiphon Loop
For reliable natural circulation:
- Connect the collector’s upper hot outlet to the tank’s upper connection.
- Connect the tank’s lower cool outlet to the collector’s lower inlet.
- Keep the hot pipe rising continuously.
- Keep the return pipe falling continuously.
- Avoid dips and high points that trap air.
- Minimize unnecessary elbows.
- Use pipe sizes appropriate for low-resistance flow.
- Insulate both lines.
Install isolation or drain valves only as permitted by the design. Never create a condition where solar-heated water becomes trapped in a sealed section without pressure relief.
Step 13: Connect a Pumped Loop
A pumped loop should be controlled by temperature difference rather than a simple timer alone.
A typical differential controller starts circulation when:
[
\text{Collector temperature}>\text{Tank temperature by the selected differential}
]
It stops when the temperature difference becomes too small to transfer useful heat.
The system may also need:
- Check valve to prevent nighttime reverse circulation
- Flow-control valve
- Expansion tank
- Air separator
- Pressure-relief valve
- Temperature sensors
- High-limit control
- Freeze-protection logic
- Isolation and drain valves
Use components rated for solar stagnation temperatures.
Step 14: Insulate the Pipes and Tank
Any exposed hot surface wastes energy.
Insulate:
- Hot collector outlet
- Cold return where appropriate
- Storage tank
- Valves where serviceability allows
- Heat-exchanger connections
- Interior distribution piping
Outdoor insulation must be protected against:
- Ultraviolet light
- Rain
- Animals
- Physical damage
- Wind
- High temperatures
Ordinary indoor foam insulation may degrade quickly outdoors.
Do not cover relief valves, drain openings, electrical equipment, labels, or components that require access.
Step 15: Install Temperature Monitoring
At minimum, monitor:
- Collector outlet temperature
- Storage-tank temperature
- Water delivered to the user
More advanced monitoring may include:
- Collector inlet temperature
- Differential-controller status
- Flow rate
- System pressure
- Heat-transfer-fluid condition
- Maximum recorded temperature
Temperature information helps reveal:
- Failed circulation
- Nighttime heat loss
- Overheating
- Inadequate insulation
- Unexpected stagnation
- Sensor failure
Never touch exposed copper tubing to judge its temperature.
Step 16: Add Overheat Protection
A collector can continue absorbing heat when the tank is already hot.
Possible professional strategies include:
- Proper collector sizing
- Heat-dump circuit
- Drainback operation
- Controller high-limit mode
- Approved stagnation design
- Collector covering designed for safe use
- Seasonal tilt adjustment
- Vacation mode
- Appropriately sized expansion equipment
Do not cover hot glass casually with a plastic tarp. A cover may melt, blow away, trap heat, or create a fall hazard during rooftop installation.
Plan the unused-heat strategy before operating the system.
Step 17: Fill and Commission the System
Commission the system during mild, controlled conditions—not during the hottest afternoon of the year.
A basic commissioning sequence includes:
- Inspect all structural mounts.
- Confirm valves are positioned correctly.
- Fill with the approved fluid.
- Remove trapped air.
- Inspect for leaks.
- Confirm expansion-tank settings.
- Test relief devices according to manufacturer instructions.
- Verify pump direction.
- Confirm controller operation.
- Check flow rate.
- Observe collector inlet and outlet temperatures.
- Test the mixing valve.
- Verify backup-heater operation.
- Check nighttime reverse circulation.
- Record baseline readings.
A qualified professional should commission a pressurized domestic system.
How Much Hot Water Will It Produce?
There is no universal temperature-rise table.
Performance depends on:
- Collector area
- Solar intensity
- Outdoor temperature
- Starting water temperature
- Wind
- Cloud cover
- Collector angle
- Absorber quality
- Tubing contact
- Flow rate
- Storage volume
- Insulation
- Heat loss through glazing
- Time of day
The infographic’s claimed 40°F-to-70°F rise in full sun should not be treated as guaranteed performance.
Measure the actual system.
Useful records include:
| Date | Weather | Starting tank temperature | Maximum temperature | Water volume | Notes |
|---|---|---|---|---|---|
| Clear | |||||
| Partial cloud | |||||
| Cloudy |
Collect several weeks of data before deciding how much conventional energy the collector replaces.
Common Building Mistakes
Using an improvised pressurized tank
A metal container is not a safe pressure vessel merely because fittings can be attached to it.
Connecting directly to a shower
Solar temperature changes throughout the day. A thermostatic mixing valve and appropriate backup water heater are essential.
Treating solar-heated water as purified
Heating may be uneven and insufficient to control pathogens.
Using nonpotable materials
Paint, sealants, hoses, solder, tanks, and fittings may contaminate water.
Forgetting thermal expansion
Trapped heated water can produce dangerous pressure.
Assuming insulation prevents freezing
Insulation slows heat loss; it does not create heat.
Using automotive antifreeze
Toxic automotive fluids should never be used where contamination of domestic water is possible.
Placing the tank too low for thermosiphon flow
Natural circulation may stall or reverse.
Failing to protect against nighttime circulation
Stored heat can escape through the collector after sunset.
Allowing air pockets
Air locks can stop flow and cause local overheating.
Installing ordinary plastic inside the collector
Collector stagnation temperatures may exceed the material’s rating.
Mounting on the roof without structural review
Water, collector weight, and wind loads can damage the structure.
Oversizing the collector
Too much collector area can create chronic summer overheating.
Maintenance Schedule
Monthly during active use
- Inspect for leaks.
- Check temperature readings.
- Clean the glazing when safe.
- Examine pipe insulation.
- Confirm that vents and drains remain clear.
- Look for corrosion.
- Test pump operation.
- Check for unusual noise.
- Inspect the storage tank.
- Flush low-use lines according to the water-management plan.
Every six months
- Inspect mounting bolts.
- Examine glazing seals.
- Check pipe supports.
- Test controller sensors.
- Inspect electrical connections.
- Verify mixing-valve performance.
- Check expansion-tank condition.
- Inspect relief-valve discharge piping.
- Examine the absorber for condensation damage.
Annually
- Have the domestic system professionally inspected.
- Test heat-transfer fluid.
- Check freeze protection.
- Evaluate scale buildup.
- Service pumps and valves.
- Inspect roof flashing.
- Review maximum recorded temperatures.
- Confirm backup-heater operation.
- Replace damaged insulation.
- Review water-quality controls.
After freezing weather
- Inspect for split tubes.
- Check pressure.
- Look for hidden leaks after thawing.
- Do not restart a damaged system.
After overheating or stagnation
- Inspect fluid condition.
- Check pressure-relief operation.
- Examine gaskets and seals.
- Verify controller function.
- Have degraded heat-transfer fluid replaced.
Pre-Operation Safety Checklist
Collector
- Box is structurally sound
- Glazing is mechanically retained
- Tubing has passed its required test
- Insulation is temperature rated
- Penetrations are sealed
- Drainage is provided
- Mount resists expected wind
- No sharp edges are exposed
Plumbing
- All materials match the intended water use
- Storage tank is approved for the application
- Thermal expansion is controlled
- Required relief valves are installed
- Relief discharge is unobstructed
- Thermostatic mixing valve is installed
- Backflow protection meets local requirements
- Pipes are insulated
- Isolation valves cannot trap heated fluid dangerously
Operation
- Freeze strategy is active
- Overheat strategy is active
- Pump direction is correct
- Air has been purged
- Tank and collector temperatures are monitored
- Backup heater works
- Water-quality plan is established
- Household members understand scalding risks
Is a DIY Solar Water Heater Worth Building?
It may be worthwhile when:
- You have reliable sunshine.
- You want a low-pressure educational project.
- Hot-water demand occurs during sunny periods.
- The system can be monitored.
- Freeze risk is minimal or properly managed.
- Local fuel or electricity costs are high.
- A professional will handle domestic integration.
- You understand that output changes with weather.
It may not be appropriate when:
- The collector must be placed on a difficult roof.
- The climate freezes regularly.
- Nobody can perform maintenance.
- The system will sit unused for long periods.
- Potable-water safety cannot be verified.
- An improvised tank would be pressurized.
- There is no safe overheat strategy.
- The property is rented or occupied by vulnerable people.
- A manufactured system costs only slightly more.
A solar collector is often most useful as a preheater. It raises incoming water temperature before the conventional water heater finishes the job. This preserves reliable hot water while reducing the energy the backup heater must supply.
Final Takeaway
A DIY solar water heater can capture useful heat, but the collector box is only the visible part of the project.
A safe system also needs:
- Correct collector materials
- Reliable circulation
- Properly rated storage
- Thermal-expansion control
- Pressure and temperature relief
- Scald protection
- Freeze protection
- Overheat management
- Potable-water compatibility
- Stagnation and microbial controls
- Structural mounting
- Regular inspection
For a learning project, keep the system nonpressurized, small, accessible, and separate from household drinking-water plumbing.
For showers, sinks, laundry, and domestic use, install a manufactured or professionally designed solar preheating system with a conventional backup heater and thermostatic mixing valve.
Never seal water inside an improvised container and place it in the sun. Never assume solar-heated water is safe to drink. Never rely on pipe insulation alone to prevent freezing.
Harness the sun—but control the heat, pressure, and water quality before sending that water into your home.