An old ceiling fan looks surprisingly similar to a small wind turbine.
It has blades, bearings, a rotating shaft, copper windings, and wires. That makes it tempting to remove the fan from the ceiling, mount it outdoors, and use the wind to charge a battery.
But there is an important reality:
Most ceiling fans cannot be converted into useful wind generators simply by placing them on a pole.
A successful generator requires:
- A motor capable of producing electricity at practical rotational speeds
- Outdoor-rated turbine blades
- A strong hub and rotor
- Overspeed protection
- Weather-resistant bearings and electrical connections
- A wind-specific charge controller
- A diversion or dump load
- Correct battery protection
- A structurally engineered tower or mount
- A site with dependable, relatively smooth wind
An old fan motor may become an interesting low-power workshop experiment. It is unlikely to become a dependable home-power system without substantial redesign.
This guide explains how to evaluate the idea honestly, test the motor without dangerous spinning blades, and build a small educational battery-charging experiment when the parts are suitable.
How a Wind Generator Works
A conventional electric motor converts electrical energy into rotational motion.
A generator performs the reverse process:
Rotational motion → changing magnetic field → electrical energy
When wind turns the rotor, the generator produces electricity. That electricity then travels through regulation and protection equipment before reaching a battery or electrical load.
A small battery-charging wind system may follow this path:
Wind rotor → generator → rectifier → wind charge controller → battery → fused DC load
If an inverter is added:
Battery → fuse and disconnect → inverter → protected AC load
The battery acts as an energy buffer. Wind varies constantly, but the battery can store some of the electricity produced during stronger wind for later use.
Why Most Ceiling Fans Are Poor Generators
The fact that a motor can rotate does not mean it will generate useful power efficiently.
Many ceiling fans use induction-type motors
A traditional AC ceiling fan frequently uses a single-phase induction motor with a capacitor and multiple speed windings.
An induction motor does not contain the same permanent-magnet arrangement used in many small wind generators. It may not produce useful voltage when turned slowly unless it receives appropriate excitation and reaches the necessary speed.
Creating a self-excited induction generator is a specialized electrical-engineering project involving:
- Capacitor selection
- Rotor speed
- Frequency control
- Voltage regulation
- Load matching
- Overspeed protection
It is not the simple conversion shown in many online diagrams.
Some modern fans use permanent-magnet motors
Certain efficient DC or electronically commutated ceiling fans contain permanent magnets.
These motors may generate electricity when mechanically driven, but the original electronic controller can complicate the conversion. The motor may produce:
- Three-phase AC
- Variable-frequency AC
- Pulsed output
- A voltage too low at practical wind speeds
- A voltage too high during overspeed
A rectifier and a compatible wind controller may be required.
Ceiling-fan motors are designed for different operating conditions
A ceiling-fan motor is designed to:
- Receive controlled electricity
- Turn at a relatively predictable speed
- Operate indoors
- Support lightweight indoor blades
- Run without rain, hail, or strong gusts
A wind-turbine generator must tolerate:
- Constant speed changes
- Sudden gusts
- Reversing loads
- Vibration
- Rain and condensation
- Bearing thrust
- Overspeed
- Electrical braking
- Long periods of outdoor exposure
These are very different jobs.
Do Not Reuse Indoor Ceiling-Fan Blades Outdoors
Standard ceiling-fan blades are not wind-turbine blades.
Indoor blades may be made from:
- Fiberboard
- Thin plywood
- Decorative plastic
- Pressed composite material
- Lightweight metal
- Wood not rated for outdoor exposure
They are designed to move indoor air while being driven by a controlled motor. They are not designed to capture uncontrolled outdoor wind.
Outdoor use may cause them to:
- Swell or delaminate
- Crack around mounting holes
- Bend backward
- Become unbalanced
- Strike the pole
- Detach during high wind
- Throw fragments toward people or property
Attaching fewer original fan blades does not turn them into safe propeller blades.
A practical turbine needs engineered blades matched to:
- Generator torque
- Desired operating speed
- Rotor diameter
- Tip-speed ratio
- Expected wind range
- Hub strength
- Governing or furling system
Do not mount reused indoor blades where their failure could injure someone.
What Power Can You Realistically Expect?
A generic table promising 10, 50, or 150 watts from a ceiling fan cannot be trusted.
Output depends on:
- Motor construction
- Permanent-magnet strength
- Winding resistance
- Rotational speed
- Rotor diameter
- Blade shape
- Wind speed
- Controller losses
- Rectifier losses
- Battery voltage
- Mechanical friction
- Turbulence
Wind speed matters enormously
The available power in wind increases approximately with the cube of wind speed.
If wind speed doubles, the theoretical available wind power increases by roughly eight times:
[
2^3=8
]
This is why a turbine may produce almost nothing in a light breeze but considerably more in stronger wind.
It also explains why high-wind protection is essential. The same increase that improves production also places rapidly increasing loads on:
- Blades
- Hub
- shaft
- Bearings
- Tail
- Tower
- Guy wires
- Foundation
Electrical output formula
When testing a generator, calculate DC output using:
[
\text{Watts}=\text{Volts}\times\text{Amps}
]
For example, 14 volts at 1 amp equals:
[
14\times1=14\text{ watts}
]
Measuring 30 volts with no load does not prove that the generator can produce useful power. Voltage may collapse as soon as a battery or resistor is connected.
Useful testing must measure both voltage and current under a controlled load.
Start by Identifying the Motor
Before building blades or a tower, determine what kind of motor you have.
Read the label
Look for:
- Manufacturer
- Model number
- Input voltage
- Frequency
- Wattage
- RPM
- Wiring diagram
- Motor type
- Capacitor value
- Safety certifications
Search for the official service manual when available.
Examine the wiring
A traditional AC fan may have:
- Neutral wire
- Separate speed leads
- Capacitor connections
- Light-kit wires
- Direction-switch wiring
A modern permanent-magnet motor may have:
- Three motor-phase wires
- Hall-sensor wires
- An electronic control module
- Low-voltage control wiring
- Proprietary connectors
Wire colors are not universal. Do not assume that red is always positive or black is always negative.
Check for permanent magnets
With the fan disconnected, a permanent-magnet motor may exhibit noticeable magnetic resistance or “cogging” as its rotor turns.
This is not a conclusive test. Some motors rotate smoothly even when magnets are present, and mechanical drag can feel similar.
Measure winding resistance
A multimeter can help identify winding pairs, but it cannot confirm full generator performance.
Do not perform resistance testing while the motor remains connected to:
- Household power
- A capacitor
- A controller
- A battery
- Any energized circuit
If the fan contains an AC capacitor and you do not understand how to verify that it is discharged safely, have a qualified technician handle it.
Which Motors Are Most Promising?
A permanent-magnet motor is generally the best candidate for a small experimental generator.
Potential candidates may include:
- Permanent-magnet brushless motors
- Certain direct-drive appliance motors
- Purpose-built permanent-magnet alternators
- Some treadmill motors
- Certain e-bike or scooter motors
- Certified small wind-turbine generators
Even among permanent-magnet motors, the required speed may be too high for a direct-drive wind rotor.
For example, a motor might generate useful charging voltage only at 800 RPM, while the homemade rotor reaches only 150 RPM in ordinary wind.
Possible solutions include:
- A larger rotor
- Rewinding the motor
- A belt or chain drive
- A different generator
- A higher-voltage battery arrangement
Each solution introduces new losses, loads, and safety concerns. In many cases, buying a properly matched wind generator is cheaper and safer than heavily modifying a ceiling-fan motor.
Materials for a Safe Bench Evaluation
Before attempting an outdoor installation, perform a controlled indoor test without fan blades.
Possible test equipment includes:
- Removed fan motor
- Manufacturer documentation
- Digital multimeter
- Optical or contactless tachometer
- Properly rated bridge rectifier if needed
- Fuse holder and small test fuses
- Power resistor or other controlled test load
- Secure motor fixture
- Shaft coupling
- Variable-speed drill or controlled drive motor
- Insulated test leads
- Safety glasses
- Protective guard around rotating parts
- Notebook or test sheet
Do not use a battery as the first test load. Begin with open-circuit measurements and a controlled resistive load.
Step 1: Remove the Fan Safely
- Turn off the correct circuit breaker.
- Verify that the fan is de-energized with appropriate test equipment.
- Prevent anyone from restoring the circuit.
- Support the fan before releasing its mounting hardware.
- Disconnect the building wires.
- Cap and secure the household conductors in an approved electrical box.
- Lower the fan to a stable work surface.
- Remove the decorative blades and light kit.
- Record the original wiring before further disassembly.
- Inspect the motor and bearings.
Removing a ceiling fan involves household voltage and overhead work. Hire an electrician if the branch circuit or mounting arrangement is uncertain.
Step 2: Inspect the Motor
Do not continue if the motor has:
- Burned windings
- Brittle insulation
- Damaged bearings
- A bent shaft
- Cracked castings
- Severe corrosion
- Loose laminations
- Signs of overheating
- Unknown internal damage
Rotate the shaft by hand.
It should turn without:
- Grinding
- Scraping
- Severe wobble
- Excessive side movement
- Intermittent binding
A worn indoor motor is not a good candidate for a wind machine expected to operate unattended.
Step 3: Secure the Motor for Testing
Never hold the motor in one hand while driving its shaft with a drill in the other.
Mount it securely to a heavy workbench or test frame. Use:
- A proper bracket
- Strong fasteners
- Shaft alignment
- A flexible coupling
- A guard around rotating components
Do not use tape, zip ties, or hand pressure as the primary restraint.
Keep loose clothing, hair, jewelry, and fingers away from the shaft and coupling.
Step 4: Test for Generated Voltage
Permanent-magnet DC motor
A permanent-magnet brushed DC motor may produce DC voltage directly. Polarity reverses when rotation direction changes.
Brushless permanent-magnet motor
A brushless motor commonly produces multiphase AC. Its output normally requires a rectifier before charging a DC battery.
Traditional AC fan motor
A conventional ceiling-fan motor may produce little or no useful voltage during this test. Do not add random capacitors in an attempt to “wake it up.”
Testing procedure
- Identify candidate winding leads from reliable documentation.
- Set the multimeter to the correct voltage range.
- Rotate the shaft slowly.
- Record voltage.
- Increase speed gradually.
- Record RPM and voltage at several points.
- Stop if the motor, coupling, or wiring behaves abnormally.
- Repeat only within the motor’s safe mechanical speed.
Create a table:
| Shaft speed | Open-circuit voltage | Loaded voltage | Load current | Output power |
|---|---|---|---|---|
| 100 RPM | ||||
| 200 RPM | ||||
| 300 RPM | ||||
| 400 RPM |
This reveals whether the motor can reach battery-charging voltage at a realistic rotor speed.
Step 5: Test the Motor Under Load
Open-circuit voltage can be deceptive.
A generator may show 20 volts on a multimeter but provide almost no current. To evaluate it, connect an appropriate test resistor or electronic load through correct protection.
Use:
[
P=V\times I
]
Suppose the generator produces:
- 13 volts under load
- 0.4 amps
Its output is:
[
13\times0.4=5.2\text{ watts}
]
That could power a small LED light or slowly recharge a small battery. It is not enough to power a refrigerator or laptop directly.
Observe:
- Voltage stability
- Current
- Shaft speed
- Motor temperature
- Rectifier temperature
- Mechanical effort
- Vibration
If voltage drops drastically under a small load, the motor is a poor candidate.
Step 6: Determine the Cut-In Speed
A battery will accept charging current only when the charging system supplies sufficient voltage.
A nominal 12-volt lead-acid battery generally requires more than 12 volts for useful charging. The exact target depends on:
- Battery chemistry
- Temperature
- Charge stage
- Manufacturer specifications
- Controller settings
The rotational speed at which the generator begins delivering useful current is called its cut-in speed.
If the motor needs 700 RPM to begin charging but the planned rotor normally turns at 150 RPM, the direct-drive design will not work.
Do not assume that “the wind is spinning it” means that it is charging.
Step 7: Use the Correct Rectifier
A three-phase permanent-magnet motor generally needs a three-phase bridge rectifier to produce DC.
The rectifier must be rated for:
- Maximum voltage
- Maximum continuous current
- Surge current
- Heat dissipation
- Environmental conditions
Rectifiers lose some voltage and generate heat.
Mount the rectifier on a suitable heat sink when required. Protect terminals from accidental contact, moisture, and short circuits.
Do not mount exposed rectifier connections outdoors.
Step 8: Use a Wind-Specific Charge Controller
A generic solar charge controller may not be suitable for a wind turbine.
Solar panels can usually be disconnected from a battery without causing the panels to accelerate mechanically.
A wind turbine is different. If the electrical load is suddenly removed during strong wind, the rotor may accelerate dangerously.
A wind controller may regulate the system by sending excess power to a diversion or dump load.
The correct system may require:
- Wind charge controller
- Diversion controller
- Dump load
- Manual stop or brake
- Overspeed protection
- Battery-temperature compensation
- High-voltage protection
- Fuses and disconnects
Do not connect an unregulated generator directly to a battery.
Why a Dump Load Matters
When the battery becomes fully charged, the turbine may still be producing power.
Simply disconnecting the battery can remove the electrical resistance that was helping control rotor speed. The turbine may then spin much faster.
A diversion controller redirects excess energy into a compatible load, such as a purpose-built air-heating resistor.
The dump load must be able to absorb the turbine’s maximum possible output safely.
Never use an improvised bare heating element near:
- Wood
- Plastic
- Batteries
- Fuel
- Dry vegetation
- Other combustible material
A dump load is a safety component—not merely a convenient way to use extra electricity.
Step 9: Build the Battery Circuit
A small experimental system may use a 12-volt deep-cycle battery, provided every component is compatible with its chemistry.
The battery circuit should include:
- Correctly rated fuse near the positive terminal
- Battery disconnect
- Covered terminals
- Properly sized conductors
- Compatible wind controller
- Battery monitor or voltmeter
- Ventilation required by the battery manufacturer
- Secure battery enclosure
- Protected DC output circuit
Never use an automotive starting battery as though it were designed for repeated deep cycling.
Do not mix old and new batteries, different capacities, or different chemistries.
Step 10: Power Small DC Loads First
A small experimental generator is best matched to modest, direct-current loads.
Possible uses include:
- Charging a small battery
- Running an efficient LED light
- Powering a radio
- Charging USB devices through a regulated converter
- Operating a low-power sensor
- Maintaining an emergency lighting battery
Using DC loads avoids the energy consumed by an inverter.
Do not connect electronics directly to the generator’s raw output. Wind speed changes can cause voltage to rise and fall continuously.
Use the regulated battery side of the system.
Why It Probably Will Not Power a Refrigerator
A refrigerator may consume a modest amount of power while running, but its compressor can require a much larger startup surge.
A small ceiling-fan generator may produce only a few watts under normal conditions. Even if it briefly reaches 50 watts, that is far below what many refrigerators require.
To operate a refrigerator reliably, the complete system needs:
- Sufficient daily energy production
- Adequate battery capacity
- An inverter with enough surge capability
- Heavy battery wiring
- Correct overcurrent protection
- Reliable charging during poor weather
Do not confuse maximum momentary turbine output with daily usable energy.
Designing a Safer Experimental Rotor
If bench testing proves that the motor is genuinely suitable, the next stage should still be a controlled educational rotor—not an immediate rooftop installation.
A safe rotor requires engineering for:
- Blade material
- Blade-root strength
- Hub attachment
- Rotor balance
- Operating RPM
- Maximum tip speed
- Wind thrust
- Fatigue
- Overspeed control
- Blade containment during testing
Do not reuse ceiling-fan blade brackets. They were not designed for turbine thrust, gust loading, or outdoor fatigue.
Purpose-built small turbine blades and hubs are safer than improvised fan parts, but they must still match the generator.
Test any experimental rotor:
- Near ground level
- Behind a protective barrier
- Away from people and animals
- At controlled speed
- With an emergency stop
- Without unattended operation
Never stand in line with the spinning rotor.
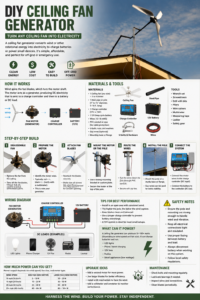
Do Not Copy the Rooftop Pole in the Infographic
Mounting a homemade turbine on the edge of a roof is one of the most concerning features in the reference image.
The U.S. Department of Energy warns that building-mounted turbines transmit vibration into the structure. Rooftop air is also highly turbulent, which can reduce production and shorten turbine life. Building-mounted systems are often less cost-effective than turbines installed on properly designed ground-supported towers. DOE Small Wind Guidebook
A roof-edge installation may create:
- Structural damage
- Water leaks
- Noise throughout the building
- Rapid bolt fatigue
- Loose guy wires
- Blade failure
- Falling ice or components
- Lightning exposure
- Difficult maintenance
- Electrical shock hazards
- Insurance and code violations
An ordinary plumbing pipe attached to fascia, rafters, or a wall bracket is not automatically a safe wind-turbine tower.
Siting a Small Wind Turbine
Wind near buildings and trees is often turbulent.
Turbulence changes speed and direction rapidly. It reduces energy production while increasing mechanical stress.
The Department of Energy’s guide offers a general siting rule: the bottom of the rotor should be at least 30 feet above obstacles located within 300 feet. This is general guidance, not permission to build an unengineered tower. DOE Small Wind Guidebook
A proper site evaluation considers:
- Average wind speed at hub height
- Wind direction
- Seasonal variation
- Nearby buildings
- Mature tree height
- Hills and ridges
- Turbulence
- Tower setbacks
- Utility lines
- Roads
- Property boundaries
- Aircraft restrictions
- Noise
- Local permits
DOE wind-resource maps indicate that areas with good exposure and annual average wind speeds around 4 meters per second or greater at 30-meter height may be suitable for small wind projects. Local terrain can make actual conditions very different from mapped estimates. DOE WINDExchange maps
A handheld wind reading at roof level on one windy afternoon is not enough to predict annual energy production.
Tower and Foundation Safety
The turbine, tower, guy wires, anchors, and foundation form one structural system.
The design must account for:
- Rotor thrust
- Turbine weight
- Tower weight
- Wind speed
- Gusts
- Fatigue
- Soil capacity
- Ice
- Corrosion
- Guy-wire tension
- Safe lowering for maintenance
- Required setbacks
A taller pipe is not automatically a better tower. Long unsupported pipe can bend, buckle, or oscillate.
Do not attach guy wires to:
- Roof gutters
- Fence posts
- Trees
- Porch railings
- Decorative masonry
- Unknown ground stakes
- Utility structures
Use an engineered tower and foundation appropriate for the turbine and site.
Plan for High Wind Before Installation
Every wind turbine needs a method for surviving conditions beyond its normal operating range.
Possible protection systems include:
- Furling tail
- Blade-pitch control
- Electrical braking
- Mechanical brake
- Controlled short-circuit braking
- Diversion load
- Automatic shutdown
- Tilt-down tower
- Manual lowering procedure
The correct method depends on the generator and turbine design.
A manual switch alone is not adequate if nobody is home when severe weather arrives.
Never approach a damaged or overspeeding turbine. Shut it down remotely if possible and keep people away until wind conditions are safe.
Electrical Safety and Grounding
Outdoor wind systems may require protection for:
- Overcurrent
- Short circuits
- Lightning effects
- Surge voltage
- Equipment grounding
- Tower grounding
- Battery faults
- Cable abrasion
- Water entry
Requirements vary by location and system voltage.
Keep wiring:
- Inside UV-resistant outdoor-rated conduit or cable systems
- Protected where it enters the tower
- Strain-relieved
- Away from sharp metal edges
- Properly fused
- Properly grounded
- Labeled at disconnects
- Accessible for inspection
Do not route loose wires down the outside of a pole as shown in the infographic.
A rotating turbine may require slip rings, a cable-twist management system, or periodic untwisting. Loose conductors can wrap around the tower, fatigue, and short.
Never Connect a Homemade Turbine to the Utility Grid
A homemade generator must not be connected directly to household wiring or the electric grid.
Grid interconnection requires:
- Approved equipment
- Utility authorization
- Anti-islanding protection
- Correct inverter
- Permits
- Inspections
- Disconnects
- Code-compliant wiring
The Department of Energy advises contacting the local utility early because grid-connected wind systems generally require a formal interconnection agreement. DOE Small Community Wind Handbook
For a DIY experiment, remain with an isolated, low-voltage battery system.
Common Conversion Mistakes
Assuming every motor is a generator
Many fan motors will not produce useful electricity at practical wind speed.
Reusing indoor blades
Ceiling-fan blades are not outdoor turbine blades and may break apart.
Using a solar controller
Wind systems may require diversion control and a dump load to prevent overspeed when the battery is full.
Connecting directly to a battery
Unregulated charging can damage the battery and create fire or gas hazards.
Believing open-circuit voltage proves useful power
A meter may show high voltage while the generator produces almost no current.
Mounting the turbine on a roof edge
Rooftop turbulence, vibration, structural loading, and difficult maintenance create serious problems.
Using ordinary PVC as a tower
PVC conduit is intended to protect cables, not support a wind rotor.
Running exposed wires down the pole
Outdoor conductors need physical, weather, and strain protection.
Ignoring high-wind shutdown
A rotor safe in a gentle breeze may fail violently during a storm.
Adding larger blades for “more power”
Larger blades create more torque and thrust. They may overload the generator, shaft, bearings, hub, tower, and foundation.
Adding a second motor carelessly
Two mismatched generators can oppose one another or create uneven mechanical loading.
A Better Low-Risk Project
If your goal is to learn rather than produce meaningful household energy, consider building a tabletop or ground-level wind demonstration.
Suggested system
- Small permanent-magnet hobby motor
- Purpose-built plastic educational turbine blades
- Protective rotor guard
- Bridge rectifier if required
- Capacitor or small approved rechargeable battery system
- Charge-control module
- LED lamp
- Voltmeter and ammeter
- Stable ground-level stand
This project can demonstrate:
- How blade speed affects voltage
- How electrical load affects rotor speed
- Why battery voltage matters
- How rectification works
- Why wind is variable
- How much energy small rotors actually collect
It provides the educational benefit without suspending an untested rotor above a house.
When to Buy a Purpose-Built Turbine
Choose a manufactured small wind turbine when you need:
- Published power curves
- Known cut-in speed
- Engineered blades and hub
- Weather-resistant components
- Overspeed protection
- Compatible controller
- Dump-load specifications
- Tower recommendations
- Installation instructions
- Warranty
- Safety testing
UL notes that small wind turbine systems may be evaluated under UL 6142. Certification may include structural, electrical, performance, safety, and duration considerations. UL wind-turbine certification information
A purpose-built turbine can still be installed incorrectly. Certification does not eliminate the need for proper siting, permits, tower design, wiring, grounding, and maintenance.
Maintenance Checklist
Before every experimental test
- Motor firmly secured
- Rotor or coupling guarded
- Fasteners tight
- Electrical leads insulated
- Correct fuse installed
- Battery protected
- Emergency stop accessible
- People clear of rotation plane
- Safety glasses worn
Monthly for an installed low-power system
- Inspect blades for cracks
- Check hub fasteners
- Check bearing movement
- Inspect tower and guy wires
- Look for corrosion
- Examine conduit and cable entry
- Test controller and dump load
- Inspect battery terminals
- Confirm fuse condition
- Listen for new vibration or noise
After strong wind
- Keep the system shut down until inspected
- Check blade alignment
- Inspect tower anchors
- Examine guy-wire tension
- Look for water entry
- Inspect wiring for twisting
- Check rectifier and controller history
- Confirm braking operation
- Do not climb the tower in unsafe conditions
Is the Project Worth Building?
It may be worthwhile when:
- You want an educational experiment.
- The fan contains a usable permanent-magnet motor.
- Bench testing confirms useful loaded output.
- You understand rectification and battery charging.
- The rotor remains small and safely guarded.
- The system powers only modest DC loads.
- You are willing to document actual performance.
It is probably not worthwhile when:
- You need dependable emergency power.
- The motor is a traditional ceiling-fan induction motor.
- Useful voltage requires extremely high RPM.
- You plan to reuse indoor fan blades.
- The turbine will be mounted on a house.
- The site has weak or turbulent wind.
- You expect to power large appliances.
- No safe overspeed system is available.
- Tower engineering costs more than a purpose-built system.
For most preparedness applications, solar panels and a correctly sized battery station are more predictable, quieter, easier to site, and mechanically safer.
Wind can still be valuable at a genuinely windy location, particularly when winter wind complements seasonal solar production. The best system uses equipment designed for that purpose.
Final Takeaway
A ceiling fan contains parts that resemble a wind turbine, but resemblance is not engineering.
The motor may produce a small amount of electricity if it contains permanent magnets and reaches sufficient speed. A traditional AC fan motor may produce little useful output without extensive modification.
The original blades, brackets, mounting hardware, and indoor wiring should not be reused as an outdoor turbine assembly.
Before building anything:
- Identify the motor.
- Secure it to a bench.
- Measure voltage at known RPM.
- Test current under a controlled load.
- Calculate actual watts.
- Determine the charging cut-in speed.
- Decide whether the result justifies further work.
If the motor passes those tests, use a correct rectifier, wind-specific controller, diversion load, fused battery circuit, and protected low-voltage output.
Do not mount the experiment on a roof or improvised pole. A wind turbine is a rotating machine exposed to unpredictable forces. Its blades, hub, braking system, tower, foundation, wiring, and controls must all survive the worst wind—not merely the pleasant breeze in which it was first tested.
Treat a ceiling-fan conversion as a low-power learning project, not as a dependable home generator.